Gallery

  • Emily de Molly

    No Love Lost
  • High Elbow

    Crummock Water
  • Dots!

  • Pocket Money Polishes - I Want Candy

  • Pocket Money Polishes Magic

    Gradient: Chanel Paradoxal and Dior Waterlily
  • Emily de Molly - Serenity

  • Fellrunning

    Dryburn Moor
  • Elevation Polish - Opal

  • Darling Diva Polish - Serendipity

  • Derwentwater

  • Pocket Money Polishes - Summertime

  • Nail Lacquer UK

    Eat My Cake
  • Scofflaw - Whiskey Tango Foxtrot

  • Hodge

  • Chanel - Taboo and Peridot

  • Chanel - Bel-Argus and Azure


Showing posts with label Matte. Show all posts

Wednesday, 26 March 2014

Models Own Speckled Eggs - MAGPIE

Models Own Speckled Eggs - Magpie
Models Own Speckled Eggs - Magpie 

Models Own Speckled Eggs are a set of pretty pastel cremes packed with black glitter in various sizes. Yes, they are very like the Illamasqua I'mPerfection speckled polishes which were a limited edition released at the beginning of last year - some of the colours are similar, some are different.... the biggest difference is the price! I only bought one of the Illa speckles but I will get around to doing a comparison sometime. For now though, here is what I think is probably my favourite Models Own Speckled Egg - Magpie. That might change as I try others, but for the moment I'm very taken by this shade. It's a gorgeous turquoise shade.

Models Own Speckled Eggs - Magpie

Models Own Speckled Eggs - Magpie
Models Own Speckled Eggs - Magpie 

Application needs a bit of care, the formula is a bit thick and gloppy; I used three thin coats for this mani, with a layer of Seche Vite between the second and third coats and then another coat of SV at the end. The polish also seemed to be a bit on the slow side to dry, although to me this is pretty much irrelevant as I always use Seche Vite. I like the effect enough to completely  forgive the slightly tricky formula.

Models Own Speckled Eggs - Magpie

Models Own Speckled Eggs - Magpie
Models Own Speckled Eggs - Magpie 


I purchased Models Own Magpie from my local Superdrug. Models Own polishes are £5, currently 3 for 2 - so working out at £3.33 these are a bargain compared to the £14.50 Illamasqua speckles (although most of the Illa ones are gone now anyway).


Models Own Speckled Eggs - Magpie
Models Own Speckled Eggs - Magpie 

Finally, I added a matte topcoat for the last day I wore this mani - when matte this really does look like a birds egg!

Models Own Speckled Eggs - Magpie (with matte topcoat)

Models Own Speckled Eggs - Magpie (with matte topcoat)

Models Own Speckled Eggs - Magpie (with matte topcoat)

Thursday, 6 February 2014

Barry M Silk Nail Paint - Gradient with Meadow and Pearl

Barry M Silk Nail Paint in Meadow and Pearl


Barry M's latest polishes are a range of beautiful pastel silk mattes. The finish is slightly waxy, or even reminiscent of the texture of a pearl, rather than a flat matte finish. The finish looks shinier in the pictures I took with my daylight lamp than in natural light - this next picture is natural light:


Barry M Silk Nail Paint in Meadow and Pearl
Barry M Silk Nail Paint in Meadow and Pearl (natural light)


I created this simple gradient with two of the Silk shades - Meadow, a pretty mint green and Pearl - a pearl-white. First, I applied two coats of Meadow, then a sponge gradient with the two colours on a damp makeup sponge. Pearl seems quite sheer and the gradient has turned out subtle, but very pretty. I might try using Pearl as the base colour if I do a gradient with these again, to see if I can get a stronger effect.

The Silk polishes handled beautifully - application and gradient were both super easy. Overall I'm really impresed with these, I really like the colours and the texture.


Barry M Silk Nail Paint in Meadow and Pearl

Barry M Silk Nail Paint in Meadow and Pearl


Barry M Silk range releases on 12 February in Superdrug and 19 February in Boots according to the press releases, but for some reason they were already on display in a Tesco I called in at last night, so I grabbed these two to try them out early

Sunday, 12 January 2014

Mentality Brute........ with Nail Art :)

Mentality Brute with Manglaze Matte is Murder


My first foray into Mentality polishes! I've always loved matte polishes, so I don't know how these stunners from Mentality managed to pass me by, but I'm really glad I found them. Better late than never!

Here is Mentality Brute alone; this is two coats. Application and coverage are perfect, and this colour just glows!

Mentality Brute

Mentality Brute


Mentality Brute

Mentality Brute


Mentality Brute
Mentality Brute


I added some geometric nail art with Manglaze Matte is Murder, since I've just joined FingerFood's Theme Buffet  nail art challenge, and this weeks theme is geometric.......

Mentality Brute with Manglaze Matte is Murder

Mentality Brute with Manglaze Matte is Murder

Mentality Brute with Manglaze Matte is Murder


For all of my nails except my ring finger, I taped off the parts I wanted to stay blue with scotch tape, then painted over. This is the first time I've tried taping in this was; I got the idea from Lucie's tutorial at Lucy's Stash. I deliberately left less of my nails exposed between the tape than Lucie did, since I wanted more of the blue in the end result. I'm pleased with how this turned out and I'm definitely adding this to my library of nail art techniques!

I purchased Mentality Brute from Sally Magpies; Manglaze Matte is Murder is an old favourite from my stash but Sally has just started selling Manglaze too. Outside the UK, Manglaze are available direct from the Manglaze website and Mentality from the Mentality BigCartel store.

Check out the other super geometric nail art in FingerFood's challenge - I love geometrics!


Sunday, 13 October 2013

Gradient and dots with Barry M new autumn texture polishes (Matte Polish in Vanilla and Caramel and Royal Textured Glitter in Lady)

Barry M Matte Vanilla and Caramel gradient with dots in Lady
Barry M Matte Vanilla and Caramel gradient with dots in Lady 
I love matte polishes, so of course I was ready and waiting for the new autumn matte colours from Barry M. I have most of the Manglaze colours and the OPI Suedes, including a red, a couple of browns and a black, so the obvious choices for me were the two lighter, nude shades - Caramel (warm nude) and Vanilla (taupe / grurple). I'm kind of coming round to 'liquid sand' style textured glitters (I loved the ones from GOSH I wore in this post here) so I bought two shades from the new Royal Textured Glitters at the same time!

This whole mani is inspired by some colour mixing a kid I was working with did the other day - creamy light beiges looking all frothy and milky like a mocha latte :) To be honest I couldn't decide which of the two mattes to try first; I love nude shades of all tones, but as I held the bottles together they called out *gradient* so here it is. Subtle, because the colours are quite close, but I really like the effect. I used one coat of Vanilla, then sponged on the gradient of the two shades. I painted the polishes directly onto a fine, damp makeup sponge. The polishes seem quite thick, but application was easy. Great for gradients too, the colours blend perfectly. I'd say these are as good for gradients as the Barry M Gelly polishes, which are just awesome for gradients (and nail art in general).

I wore the gradient alone for a day, but I never got a chance to take photographs. Then I added large dots with Lady. I was trying to create a pastel version of this vampy matte gradient with dots I did a few weeks ago. I've never tried dots with glitter before, but this worked out just fine. Lady is a lovely polish, there's lots of iridescent complexity in here. I need to wear Lady on her own soon.


Barry M Matte Vanilla and Caramel gradient with dots in Lady

Barry M Matte Vanilla and Caramel gradient with dots in Lady


Barry M Matte Vanilla and Caramel gradient with dots in Lady

I'd describe the finish on the Barry M Matte polishes as smooth and waxy, compared to my other matte polishes. Manglazes all have a slight shimmer and the finish has a 'drier' sort of feel to it than these and OPI Suedes are sort of velvety-metallic - so this is a new and unique finish (in my collection anyway). My finish on the matte base might be a bit more textured because of the sponge application too.

A couple of macros:

Barry M Matte Vanilla and Caramel gradient with dots in Lady

Barry M Matte Vanilla and Caramel gradient with dots in Lady
Barry M Matte Vanilla and Caramel gradient with dots in Lady 


I'm not usually one for slopping topcoat over polishes that are intended to be matte or textured, but for some reason I wanted to see how Lady looked shiny - so I did! Actually I love the shiny version too!

Barry M Matte Vanilla and Caramel gradient with dots in Lady

Barry M Matte Vanilla and Caramel gradient with dots in Lady

Barry M Matte Vanilla and Caramel gradient with dots in Lady

Barry M Matte Vanilla and Caramel gradient with dots in Lady

Barry M Matte Vanilla and Caramel gradient with dots in Lady

Barry M Matte Vanilla and Caramel gradient with dots in Lady

Barry M Matte Vanilla and Caramel gradient with dots in Lady
Barry M Matte Vanilla and Caramel gradient with dots in Lady 

These are super polishes and just from this mani I'd say they are quite versatile. However, take a look at Debbie Crumpet's Q&A post about these to see what else you can do with them............ I want to try stamping next, and I want to buy more matte colours (the red and rusty brown - I already got my other pick of the Royal Glitters, Countess, although I've not worn her yet). Hmm!

I purchased my Barry M Matte in Vanilla and Caramel and Royal Glitter Texture in Lady from my local Boots.

Wednesday, 28 August 2013

Vampy matt gradient with Manglaze polishes - and *magic* dots!

Manglaze Fatty's Got More Blood, Santorum and Matte is Murder

I've been enjoying dots and gradients recently, and I've always had a soft spot for matt manicures, so I decided to combine all these things to try out something just a little bit different! This is a gradient with three Manglaze polishes (Fatty's Got More Blood (deep red), Santorum (brown) and Matte is Murder (black) and shiny topcoat dots.

Here is the gradient before I applied the dots. I painted my nails with Santorum, then added a gradient with a damp sponge in the normal way. Fatty's Got More Blood at the cuticle, Santorum in the middle and Matte is Murder at the tips. The colours are close; this was deliberate, I wanted this gradient to be subtle. The Manglaze polishes work really easily together to make the gradient - I was a little nervous that if the gradient wasn't smooth, then I wouldn't be able to rely on topcoat to make it smooth, but there was no problem at all. In fact I like the finish of the Manglaze polishes so much with the sponge application I might start sponging the last coat when I use a single Manglaze colour.

Manglaze Fatty's Got More Blood, Santorum and Matte is Murder

Then I added large dots with a clear topcoat. I used Sinful Colors Gel-Tech topcoat for this - this is a thick topcoat which dries fast to a high shine. I didn't want to use a thin topcoat or clear polish that would spread out over my nails before it dried, and I wasn't sure that SV would play nice. The Sinful topcoat worked perfectly! 

Manglaze Fatty's Got More Blood, Santorum and Matte is Murder


The topcoat really accentuates the differences between the Manglaze shades and the dots stand out very effectively from the base:

Manglaze Fatty's Got More Blood, Santorum and Matte is Murder


Manglaze Fatty's Got More Blood, Santorum and Matte is Murder

In this macro shot you can see how adding a shiny topcoat brings out all sorts of sparklies in the Manglaze polishes - I know there are many people who add a topcoat as a matter of routine but I like the matt finish far too much to ever do that. Not to whole nails anyway!

Manglaze Fatty's Got More Blood, Santorum and Matte is Murder

In different lights, the effect is more pronounced. The next couple of pictures are under my desk lamp:

Manglaze Fatty's Got More Blood, Santorum and Matte is Murder

Manglaze Fatty's Got More Blood, Santorum and Matte is MurderManglaze Fatty's Got More Blood, Santorum and Matte is MurderManglaze Fatty's Got More Blood, Santorum and Matte is Murder
Manglaze Fatty's Got More Blood, Santorum and Matte is Murder - artificial light

And finally, this shot under a daylight bulb shows the sparkle and the differences in the colours with the topcoat. The topcoat really does act like magic and brings something different out from each colour of the matt polish!

Manglaze Fatty's Got More Blood, Santorum and Matte is Murder
Manglaze Fatty's Got More Blood, Santorum and Matte is Murder - Daylight bulb

I got all of my Manglaze polishes in swaps at various times, but here is a link to the Manglaze website. My Sinful Colours Gel-Tech topcoat was a gift from a friend in the USA.


Friday, 12 July 2013

Nail Art with Chanel Bel-Argus and Azure

Chanel Bel-Argus and Azure sponge gradient and stamping with matt top coat

I'll state up front, but not apologise, that this is a picture heavy post! I built this mani up over a few days, and I loved every stage of of it! So I took pictures of all the steps!

The starting point was Chanel Bel-Argus, which on it's own is a fantastic metallic blue, unlike anything else in my collection. But since I don't normally go for metallics, it's unlikely I would have had a dupe for it really.

Chanel Bel-Argus

Chanel Bel-Argus

Chanel Bel-Argus

Chanel Bel-Argus
Chanel Bel-Argus

This is three coats plus Seche Vite quick drying top coat - the colour was opaque at two coats but I'm over-sensitive to brush strokes so I sponged on a third coat thinly to fix the finish. The colour is amazing - it reminds me of the tropical Morpho butterflies.

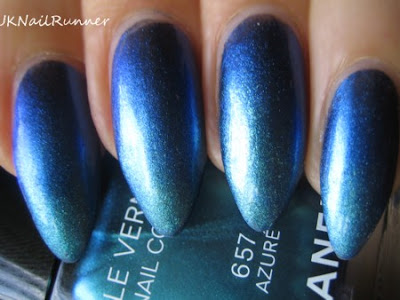
With these butterflies in mind, a couple of days later I added  a sponge gradient with Chanel Azure.
Chanel Bel-Argus and Azure

Chanel Bel-Argus and Azure
Chanel Bel-Argus and Azure sponge gradient

I don't know if Chanel had this sort of thing in mind when they released these colours together, but I think they were just made for each other :)

I love stamping for easy nail art effects, but I have a bit of a conflict because I like to wear my nails long too, and the stamping images are usually too small.......... so my stamping adventures are usually confined to when I cut my nails short. Or the complicated process of double-stamping (stamping the image twice on each nail) which doesn't work with all plates because there is no way of lining the images up on some of the designs, and in any case is tricky! But then I had an idea............. if I added a gradient to the tip of my nail, and then stamped in the same colour as the the gradient on the rest of the nail, I could get a design using just a single stamp. So I tried it out stamping with Chanel Azure over this gradient mani:


Chanel Bel-Argus and Azure

Chanel Bel-Argus and Azure

Chanel Bel-Argus and Azure
Chanel Bel-Argus and Azure sponge gradient and stamping

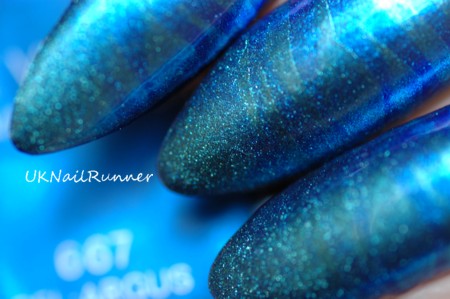
I really like how this turned out! I used one of the wavy / zebra patterns from the Cheeky Wild at Heart plate - these designs are all quite big anyway.  Here are a couple of macro shots of the stamped mani in full sun to show how rich these colours are:

Chanel Bel-Argus and Azure

Chanel Bel-Argus and Azure
Chanel Bel-Argus and Azure sponge gradient and stamping

And finally, still thinking of dusty butterfly wings, I added a matt top coat (Mavala Color-Matt).

Chanel Bel-Argus and Azure

Chanel Bel-Argus and Azure

Chanel Bel-Argus and Azure

Chanel Bel-Argus and Azure

Chanel Bel-Argus and Azure
Chanel Bel-Argus and Azure sponge gradient and stamping with matt top coat

I prefer the matt version, it shows up the pattern much better. I took these pictures in indirect sunlight indoors near a window, but finally, back to my opening full-sun macro:

Chanel Bel-Argus and Azure sponge gradient and stamping with matt top coat

I think this has to be one my favourite manis of all the ones I've ever done. Someone said it reminded her of these guys and I have to agree, although I never thought of Avatar as I was doing the nail art!


I purchased Chanel Bel-Argus and Azure from my local House of Fraser. Mavala Color-Matt top coat is my staple matt top coat and is readily available in chemists and department stores in the UK. I bought the Cheeky nail art plate from Cheeky via amazon.co.uk - although it shipped from China it was here in a couple of weeks and is great quality - I'd definitely buy from Cheeky again.