Gallery

  • Emily de Molly

    No Love Lost
  • High Elbow

    Crummock Water
  • Dots!

  • Pocket Money Polishes - I Want Candy

  • Pocket Money Polishes Magic

    Gradient: Chanel Paradoxal and Dior Waterlily
  • Emily de Molly - Serenity

  • Fellrunning

    Dryburn Moor
  • Elevation Polish - Opal

  • Darling Diva Polish - Serendipity

  • Derwentwater

  • Pocket Money Polishes - Summertime

  • Nail Lacquer UK

    Eat My Cake
  • Scofflaw - Whiskey Tango Foxtrot

  • Hodge

  • Chanel - Taboo and Peridot

  • Chanel - Bel-Argus and Azure


Showing posts with label Vampy. Show all posts

Sunday, 6 July 2014

Dark Metal Lacquers Heurt

Dark Metal Lacquer Heurt
This is the first polish I tried from the relatively new UK Indie Brand Dark Metal Lacquer. Heurt is a vampy jelly with tiny copper holo glitter. I just happened to be wearing Butter London La Moss (a dark burgundy shade) when this arrived in the mail, so I made good use of the undies I was already wearing! This mani is two thin coats of Heurt over the vampy base with Seche Vite topcoat.


Dark Metal Lacquer Heurt

Application of Heurt was smooth and easy; the jelly finish has lots of depth and my nails make me think of glittery blackberry jam! I believe heurt is french for collision!

Dark Metal Lacquer Heurt


Dark Metal Lacquer Heurt
I purchased Heurt from Dark Metal Lacquer's etsy shop (blogger discount given).

Wednesday, 11 December 2013

Binky London Swatch and Review


Binky London Pelham Pink and Sloane Silver

Binky London is a new brand that just released in the UK last week. I have a few samples to show you, let's start with a pink, since pink is one of my favourite nail colours....... the brighter the better, lol! This one is called Pelham Pink and it's from Binky's Gel Collection. It's a bright pink with great coverage, easy application and a super high gloss - this swatch is just two coats, no topcoat!

Binky London Pelham Pink

Binky London Pelham Pink
Binky London Pelham Pink 

Here's a macro to show how dense and rich the colour is in this one. I love both the colour and finish on this polish.
Binky London Pelham Pink
Binky London Pelham Pink 


Next up is Beaufort Burgundy - a rich deep burgundy, pretty much what it says on the tin. I loved this colour, I wore it alone last week for a couple of days and then I used it as the base for a Christmas nail art design (watch this space for that one!). I did use Seche Vite with this polish, mostly because I didn't want to wait around for it to dry.

Binky London Beaufort Burgundy

Binky London Beaufort Burgundy

Binky London Beaufort Burgundy


Just two coats again though, the coverage on these colours is really good. And one other thing, the brushes are a super shape, quite big, but flat and rounded (if you are an artist, they're a filbert shape) - this makes it really easy to paint a neat edge around the cuticles. I didn't need any clean up with these, not even this burgundy shade.

Binky London Beaufort Burgundy


Next is a St Tropez Taupe, a pretty nude with a slight shimmer. Two coats again.
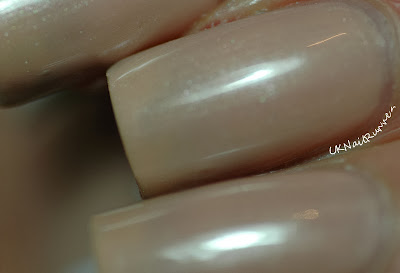
Binky London St Tropez Taupe


Binky London St Tropez Taupe

Binky London St Tropez Taupe

And finally (for tonight, I have other colours I'll be posting about in the next week or two) here is Sloane Square Silver. It's a silver foil............. I'm not the greatest fan of foil and metallic polishes on their own but I do love them for stamping! The moment I saw the consistency of this polish, I knew it would be perfect for stamping. I decided to add a gradient in this shade to really put it through its paces - and it came out with flying colours! I stamped first with an image from Bundle Monster plate BM-311 over Pelham Pink, then added the gradient with a slightly damp sponge. Binky London Sloane Square Silver is just PERFECT for stamping and blending. My promotional package included some other foils and I can't wait to try them out in nail art designs!

Binky London Pelham Pink and Sloane Silver

Binky London Pelham Pink and Sloane Silver

Binky London Pelham Pink and Sloane Silver

Binky London Pelham Pink and Sloane Silver

Overall I'm really impressed with this line. OK, the colours aren't that adventurous, but they are good staples for any collection. What I like most is the formula and application, which are superb. And the shape of the brush.

These polishes were sent for review. You can buy Binky London polishes from Escentual.com; they are £4.95. There are twelve colours in two colour collections. I have the other eight polishes (which include a glitter topper and a colour shifting topper) lined up on desk ready to try!

Friday, 1 November 2013

Tape design nail art with Barry M Countess


Barry M Countess
Barry M Countess


If you're in the UK and you haven't bought Barry M Countess yet............ you ought to! This is my favourite textured glitter polish to date! I've already shown it shiny with topcoat and a glitter topper (Femme Fatale Hydraxia) but I wanted to use it in a nail art design to showcase it's texture, rather than just wearing it as a straightforward mani.

I applied a vampy base (Nicole by OPI Smile For The Glam-era, although I probably have half a dozen *similar* colours that would work equally well), topped it off with Seche Vite to get maximum shine then applied striping tape in a random pattern. I added a single, thickish coat of Countess and removed the tape before Countess dried. I worked on just one nail at a time here - I found I got the best edges on the textured polish by removing the tape as quickly as possible. The effect is subtle, but definitely noticeable - I got several real-life complements when I wore this! However, I  might like to repeat this mani with either a very light base, perhaps a creamy nude or off-white, or a bright colour for a variation on the theme.

Barry M Countess

Barry M Countess

Barry M Countess


Barry M Countess
Barry M Countess

Here's a macro in full sun - the texture of Countess looks like sugar crystals <3

Barry M Countess
Barry M Countess

I purchased Barry M Countess from my local Boots.

Wednesday, 28 August 2013

Vampy matt gradient with Manglaze polishes - and *magic* dots!

Manglaze Fatty's Got More Blood, Santorum and Matte is Murder

I've been enjoying dots and gradients recently, and I've always had a soft spot for matt manicures, so I decided to combine all these things to try out something just a little bit different! This is a gradient with three Manglaze polishes (Fatty's Got More Blood (deep red), Santorum (brown) and Matte is Murder (black) and shiny topcoat dots.

Here is the gradient before I applied the dots. I painted my nails with Santorum, then added a gradient with a damp sponge in the normal way. Fatty's Got More Blood at the cuticle, Santorum in the middle and Matte is Murder at the tips. The colours are close; this was deliberate, I wanted this gradient to be subtle. The Manglaze polishes work really easily together to make the gradient - I was a little nervous that if the gradient wasn't smooth, then I wouldn't be able to rely on topcoat to make it smooth, but there was no problem at all. In fact I like the finish of the Manglaze polishes so much with the sponge application I might start sponging the last coat when I use a single Manglaze colour.

Manglaze Fatty's Got More Blood, Santorum and Matte is Murder

Then I added large dots with a clear topcoat. I used Sinful Colors Gel-Tech topcoat for this - this is a thick topcoat which dries fast to a high shine. I didn't want to use a thin topcoat or clear polish that would spread out over my nails before it dried, and I wasn't sure that SV would play nice. The Sinful topcoat worked perfectly! 

Manglaze Fatty's Got More Blood, Santorum and Matte is Murder


The topcoat really accentuates the differences between the Manglaze shades and the dots stand out very effectively from the base:

Manglaze Fatty's Got More Blood, Santorum and Matte is Murder


Manglaze Fatty's Got More Blood, Santorum and Matte is Murder

In this macro shot you can see how adding a shiny topcoat brings out all sorts of sparklies in the Manglaze polishes - I know there are many people who add a topcoat as a matter of routine but I like the matt finish far too much to ever do that. Not to whole nails anyway!

Manglaze Fatty's Got More Blood, Santorum and Matte is Murder

In different lights, the effect is more pronounced. The next couple of pictures are under my desk lamp:

Manglaze Fatty's Got More Blood, Santorum and Matte is Murder

Manglaze Fatty's Got More Blood, Santorum and Matte is MurderManglaze Fatty's Got More Blood, Santorum and Matte is MurderManglaze Fatty's Got More Blood, Santorum and Matte is Murder
Manglaze Fatty's Got More Blood, Santorum and Matte is Murder - artificial light

And finally, this shot under a daylight bulb shows the sparkle and the differences in the colours with the topcoat. The topcoat really does act like magic and brings something different out from each colour of the matt polish!

Manglaze Fatty's Got More Blood, Santorum and Matte is Murder
Manglaze Fatty's Got More Blood, Santorum and Matte is Murder - Daylight bulb

I got all of my Manglaze polishes in swaps at various times, but here is a link to the Manglaze website. My Sinful Colours Gel-Tech topcoat was a gift from a friend in the USA.