Gallery

  • Emily de Molly

    No Love Lost
  • High Elbow

    Crummock Water
  • Dots!

  • Pocket Money Polishes - I Want Candy

  • Pocket Money Polishes Magic

    Gradient: Chanel Paradoxal and Dior Waterlily
  • Emily de Molly - Serenity

  • Fellrunning

    Dryburn Moor
  • Elevation Polish - Opal

  • Darling Diva Polish - Serendipity

  • Derwentwater

  • Pocket Money Polishes - Summertime

  • Nail Lacquer UK

    Eat My Cake
  • Scofflaw - Whiskey Tango Foxtrot

  • Hodge

  • Chanel - Taboo and Peridot

  • Chanel - Bel-Argus and Azure


Showing posts with label Purple. Show all posts

Saturday, 12 April 2014

Flash Nails Princess

Flash Nails Princess with OPI & Apple Pie


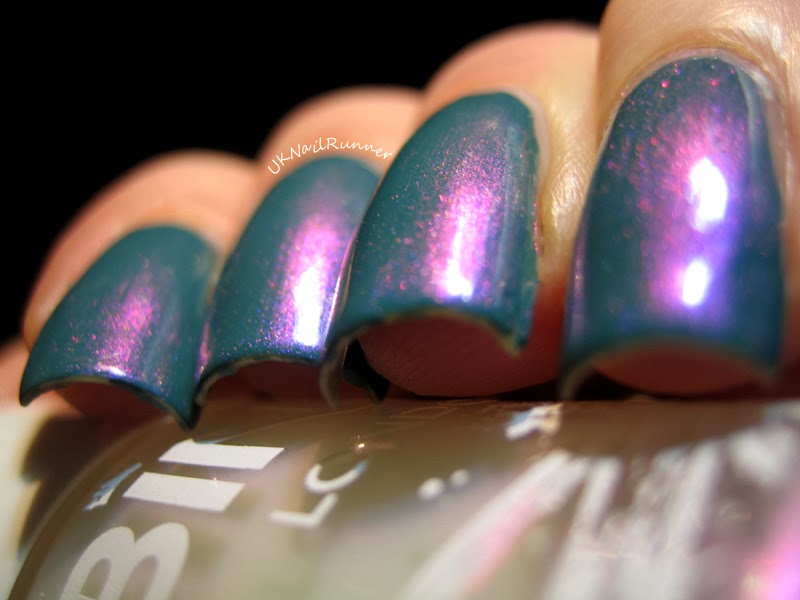
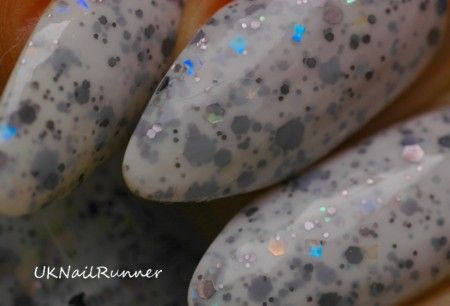
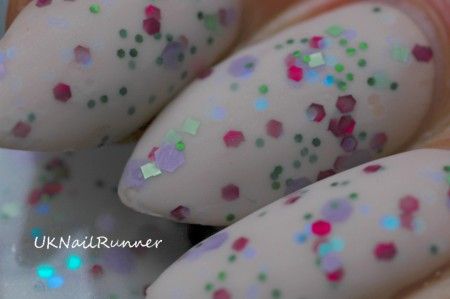
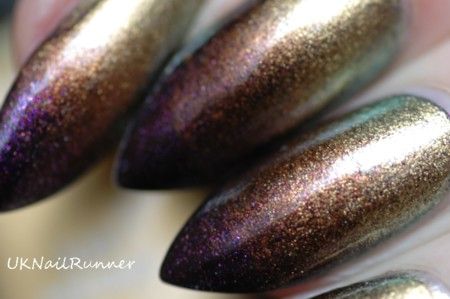
Today I have another polish from UK Indie Flash Nails to show off. This one is Princess - it's a lovely mixture of matte pink hexes and shards (some of the shards are big and stunning), purple rhombuses (more correctly rhombi - if you're not a mathematician you can call them diamonds, lol) and a nice take on balck and white - black dots and white rectangles. Oh, and some shiny gunmetal hexes too. Super mix, in my opinion.

I've paired this with a classic OPI that most people either love or hate - OPI & Apple Pie. I love it of course, but I would since I love all the poopy colours.


Flash Nails Princess with OPI & Apple Pie


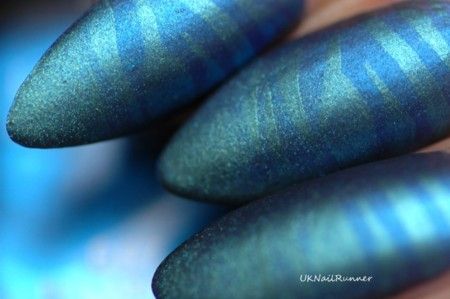
Flash Nails Princess is easy to apply, a bit of fishing required for the purple and black glitters but nothing to cause much concern. This is just one coat of Princess; I like how this looked without packing my nails too full of glitter. The base of Flash Nails polishes is quite heavy and thick, which I appreciate as it reduces the amount of topcoat needed to make the mani nice and smooth. I just used one thick coat of Seche Vite to finish this off. When glitters are rough and lumpy I use Gelous as a smoother, but there is something in the formula of Gelous that doesn't play quite nicely with my nails... somehow it makes them contract a bit and the corners curl under, which I hate. I only notice this when my nails are square of course, but it's still nice to have a glitter that doesn't need Gelous!

Flash Nails Princess with OPI & Apple Pie

Flash Nails Princess with OPI & Apple Pie

Flash Nails Princess with OPI & Apple Pie

Flash Nails Princess with OPI & Apple Pie

Flash Nails Princess with OPI & Apple Pie

I bought Flash Nails Princess from Flash Nails Etsy Shop. OPI & Apple Pie is an old favourite from my collection, long discontinued I'm afraid.

I'm planning to add some Hipster-themed stamping to this mani with my new MoYou Hipster plates, so watch this space for how it turns out :)

Saturday, 29 March 2014

R&R Lacquers SMASH!

R&R Lacquers SMASH!
R&R Lacquers SMASH!


This was one of those polishes I knew I *had to have* the moment I saw it! I love the combination of just about any pink/red/purple with green. Yes, this polish does remind me of one of my favourite indies, HARE Asteroid Turf ...

... but the glitters are bigger, and darker, and matte (big bonus for me, I have an obsession with matte glitter!) and the base is much more complex, with shimmer, tiny gold-green flakies and small square lavender glitters. So I have another favourite indie now!

Here is Smash in the bottle:


Onto my nails, I used two coats of R&R Lacquers Smash over a single coat of Illasmasqua Smash (same name, same green! but probably unnecessary, as R&R Smash covers really well, much better than I was anticipating). I used a thickish coat of Gelous and a coat of Seche Vite quick drying topcoat and the finish was glassy smooth. 

R&R Lacquers SMASH!
R&R Lacquers SMASH!

I think the jelliness of the base is just about perfect to give depth to the glitters in the first layer without obscuring them completely - the magenta glitter in the top coat are much brighter.

R&R Lacquers SMASH!

R&R Lacquers SMASH!
R&R Lacquers SMASH!

The accent nail is a reworked left over from my last mani (Barry M Lychee dots on Nails Inc St Martins Lane); I removed two dots using a cotton bud dipped in acetone to create the 'negative dots' - loving the texture of this and added a smaller green dot (Illamasqua Smash) to the remaining dots. All credit to Stef at Fairly Charming for this negative dot effect - I've been meaning to try this out since I saw her 'cheese mani'!

This next picture is in artificial light and although the green base is brighter than irl, the lighting shows up the glitters and flakies nicely...

R&R Lacquers SMASH!
R&R Lacquers SMASH! (artificial light)


And finally, here's a nail macro (natural light) to show the complexity of Smash:

R&R Lacquers SMASH!
R&R Lacquers SMASH!


I purchased R&R Lacquers Smash from R&R Lacquers Etsy shop. Everything else used in this post is from my collection and purchased by me. I just realised, all the colours in this mani are UK brands :)


Friday, 28 March 2014

NOTD - Nails Inc St Martins Lane with Barry M Lychee Dots ...

Nails Inc St Martins Lane with Barry M Lychee Dots


If you only ever do nail art once - do some big dots with Barry M Lychee! This is becoming a nail art standby for me - so easy and I love the effect.

Nails Inc St Martins Lane with Barry M Lychee Dots


My base colour, Nails Inc St Martins Lane is a red-leaning magenta which is quite sheer and almost 'glows' in full sun. In the shade and in indoor lighting it looks quite a bit darker, but is still a beautiful and quite unusual shade. This is three coats.

Nails Inc St Martins Lane with Barry M Lychee Dots

Nails Inc St Martins Lane with Barry M Lychee Dots

Nails Inc St Martins Lane with Barry M Lychee Dots


Nails Inc St Martins Lane with Barry M Lychee Dots

Friday, 28 February 2014

Flash Nails Jagged

Flash Nails Jagged over Illamasqua Jo'mina and NARS 15 Minutes

I've been sad to see a few of the UK Indie brands (including some of my favourites) shutting up shop recently, so it's great to see new ones coming in to the market! Here's a brand new UK Indie, Flash Nails, who just opened her Etsy shop last week.

This polish is called 'Jagged' and it's a mix of multicoloured shard glitter. I have a fascination with the irregular shapes in shard glitter polishes, so I love this!

Flash Nails Jagged over Illamasqua Jo'mina and NARS 15 Minutes

Flash Nails Jagged over Illamasqua Jo'mina and NARS 15 Minutes


I used two thin coats of Flash Nails Jagged here; the polish is easy to apply with plenty of glitter - no need to fish them out or do any special placement on the nails. The base of the polish is quite thick, but easy to handle. I found the glitters lay nice and flat on my nails; I added one coat of Gelous to smooth the mani out and a coat of Seche Vite quick drying top coat.

The gradient base is NARS 15 Minutes and Illamasqua Jo'Mina, a couple of favourite spring bright shades of mine.


Flash Nails Jagged over Illamasqua Jo'mina and NARS 15 Minutes

Flash Nails Jagged over Illamasqua Jo'mina and NARS 15 Minutes


Flash Nails Jagged over Illamasqua Jo'mina and NARS 15 Minutes

Flash Nails Jagged over Illamasqua Jo'mina and NARS 15 Minutes

I purchased Jagged from Flash Nails Etsy Shop. Actually I purchased more than one; there are lots of pretty glitters here - so watch out for more from this brand here soon. The NARS and Illamasqua polishes are old favourites from my collection.

Tuesday, 14 January 2014

Binky London Swatch and Review - part 3

Binky London Grosvenor Gold and Pimlico Purple


These are the last four of the new Binky London range I've been trying out. Firstly, let's look at the two metallic colours, Pimlico Purple and Grosvenor Gold. I wanted to put these through their paces with stamping, since the silver metallic I reviewed earlier, Sloane Square Silver, stamped so magnificently. Here's the full mani I stamped, using a new plate from MoYou London, Explorer Collection #5. I love this stamping plate - I'm not going to turn this post into a review of the stamping plate but I will say that these overall-design stamping plates are fantastic for longer nails!

Binky London Grosvenor Gold and Pimlico Purple


Binky London Grosvenor Gold and Pimlico Purple


To start, I painted my ring finger with Pimlico Purple and the rest with Grosvenor Gold. On their own, both of these are pretty shades; I think I'd describe Grosvenor Gold as more of a champagne colour than a full on gold. The fomula is good - very dense so it covers quickly and its easy to handle.

Binky London Grosvenor Gold and Pimlico Purple

Binky London Grosvenor Gold and Pimlico Purple


This is two coats (both colours). Metallic shades like these always tend to show brush strokes, so this  doesn't concern me in the least with this product - if I was going to wear a shade like this on it's own than I apply the second coat with a fine, slightly dampened makeup sponge (see my application of Sloane Square Silver for how this looks) to avoid this. As I was going to be adding nail art over this base, I didn't bother with this here.

The polishes stamp superbly - look at the small open circles on my index finger! This is Pimlico Purple stamping over Grosvenor Gold. My little finger is also stamped with Pimlico Purple; the wide band with tiny slits in has printed perfectly onto my nail! On my ring finger the colours are reversed, Grosvenor Gold is stamped onto the base of Pimlico Purple but that worked really well too.


Binky London Grosvenor Gold and Pimlico Purple

Binky London Grosvenor Gold and Pimlico Purple

Binky London Grosvenor Gold and Pimlico Purple


Perfect polishes for stamping! I can see these three getting a lot of use from me in nail art in the future :)

And lastly, ...well, I like to save the best until last! My favourite colour in the whole collection has to be Parsons Green. I love teal nail polish, and this is a superb example. The colour is rich and deep, and the application is perfect. This mani is two coats, with Seche Vite quick drying topcoat to seal and shine. The first two pictures are in my diffuser, the last one in direct light from the window. What a perfect colour!


Binky London Parsons Green


Binky London Parsons Green

Binky London Parsons Green


OK, that's not quite everything............. as Binky London also released a colour shifting topcoat, Paris Pearl. Paris Pearl looks like a white polish in the bottle but its actually a clear topper with a strong pink shimmer. I added one coat of Paris Pearl to Parsons Green and look what happens............


Binky London Parsons Green with Paris Pearl Topcoat

Binky London Parsons Green with Paris Pearl Topcoat


The magenta flash looks wonderful against the dark teal base, but I bet this would look fantastic over black or a near-black shade too! Awesomesauce!


My earlier reviews of the other polishes in the Binky London range are here and here. Overall I'm really impressed with the brand, the formula and brush are great. My favourite shades in the range are Parsons Green and Raffles Red, and I think the metallic shades (Sloane Square Silver, Grosvenor Gold and Pimlico Purple) are amazing polishes for stamping. I'm looking forward to seeing what the brand come up with next - I'm hoping there are some more adventurous shades in the next collection.

My bottles are press samples sent for review, but they are available to purchase from Escentual.


Monday, 30 December 2013

Skittles with Butter London Wellies & Illamasqua Faux Pas

Butter London Wellies with Illamasqua Faux Pas


Here's a bit of bright jolly fun! Two of my favourite nail art techniques (dots and gradient) and one of my favourite colour combinations, lime and blurple!

The base is Butter London Wellies, a fabulous lime shade from their current autumn/winter collection. I remember seeing swatches of this back in the late summer, and thinking I absolutely must have the colour, then of course I've forgotten all about it. Months later, as is always the case in the UK (well maybe just outside of London, but certainly for me), it turned up in my local Boots............. and jumped straight off the shelf, into my basket and onto my nails the minute I got it home. Here it is - wonderful!!


Butter London Wellies


Butter London Wellies

Butter London Wellies


I'm going to call the colour *lime* because I can't decide whether it's a greeny-yellow or a yellowy-green. I'm fairly sure it's unique in my collection - it is more yellow than OPI Who The Shrek Are You, which is the nearest  I have I think. The formula is also massively better than OPI WTSAY - Wellies is a richly pigmented creamy polish. I was surprised how good it was - I love yellows but I have no expectations that they will anything other than a streaky mess to apply, irrespective of brand.

Butter London Wellies

Butter London Wellies


This is three coats with Seche Vite. I wore this for three days on its own before I added the nail art and it was still looking perfect.

So on to the skittles.............

Butter London Wellies with Illamasqua Faux Pas

I'm not sure if these really are skittles, or if the mani is a 'skittlette' - maybe someone can tell me. Every nail IS different - but my index and middle fingers are a mirrored pair...and all the nails have the same two colours. Semantics, lol!

My contrast colour is Ilamasqua Faux Pas; I choose this particular purple because of its rubber texture, to contrast with the gloss on some of my nails.


Butter London Wellies with Illamasqua Faux Pas


For the index and middle fingers, I added a vertical gradient with Illa Faux Pas, dotted over it with Wellies and added topcoat.  Ring finger is dotted with Faux Pas but no topcoat. Little finger is gradient of Faux Pas, no topcoat, then big dots of Faux Pas (no topcoat again). I really like the way the rubbery finish on the Illamasqua works with the sponge gradient!


Butter London Wellies with Illamasqua Faux Pas


Butter London Wellies with Illamasqua Faux Pas

Butter London Wellies with Illamasqua Faux Pas

The ring and little fingers are the ones I like best! My thumb is just a reverse of my little finger, I added the gradient at the cuticle end and dots in BL Wellies.

Butter London Wellies with Illamasqua Faux Pas


Butter London Wellies with Illamasqua Faux Pas

I purchased Butter London Wellies at Boots. Illamasqua Faux Pas was a gift some time ago but it's still available at Illamsaqua's website (currently on sale for £5 in fact!).