Gallery

  • Emily de Molly

    No Love Lost
  • High Elbow

    Crummock Water
  • Dots!

  • Pocket Money Polishes - I Want Candy

  • Pocket Money Polishes Magic

    Gradient: Chanel Paradoxal and Dior Waterlily
  • Emily de Molly - Serenity

  • Fellrunning

    Dryburn Moor
  • Elevation Polish - Opal

  • Darling Diva Polish - Serendipity

  • Derwentwater

  • Pocket Money Polishes - Summertime

  • Nail Lacquer UK

    Eat My Cake
  • Scofflaw - Whiskey Tango Foxtrot

  • Hodge

  • Chanel - Taboo and Peridot

  • Chanel - Bel-Argus and Azure


Showing posts with label Water Marble. Show all posts

Sunday, 1 September 2013

Pocket Money Polishes Brown Eyed Girl


Pocket Money Polishes Brown Eyed Girl

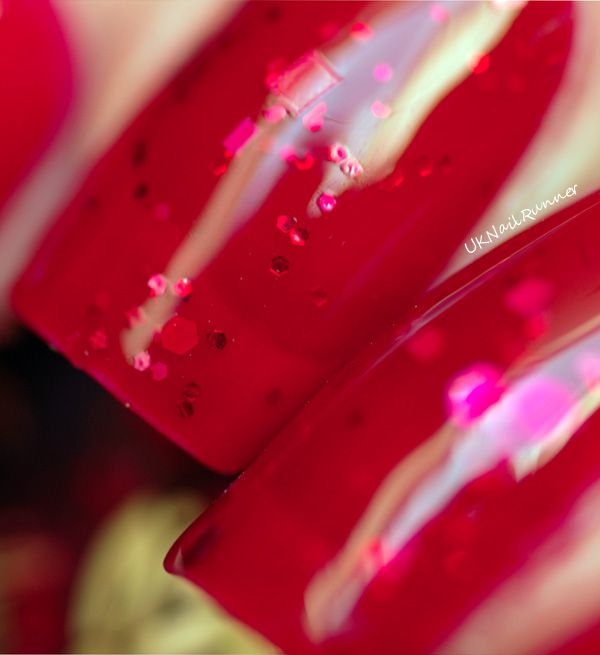
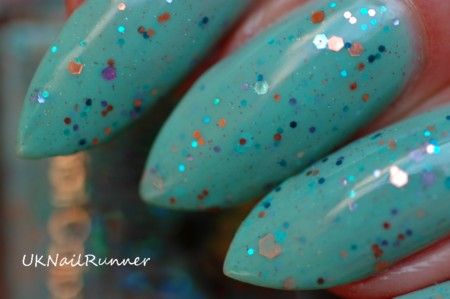
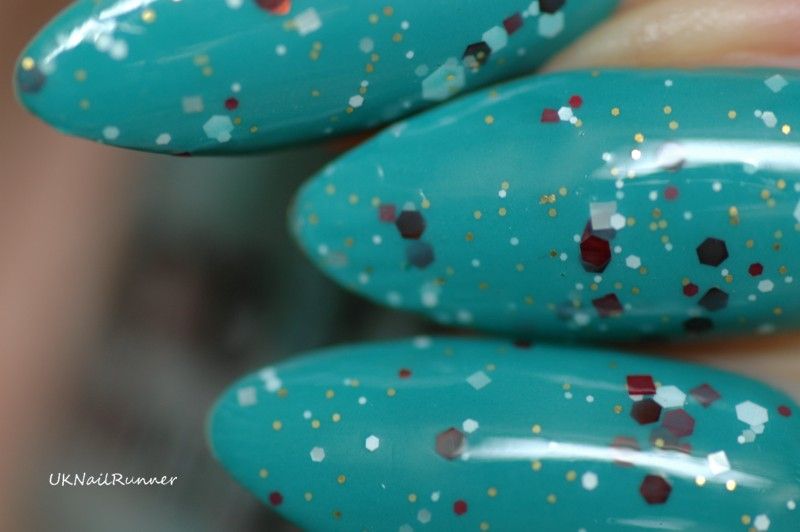
Today I want to show you the last of my Pocket Money Polishes September colours. This is Brown Eyed Girl - a complex mix of brown, gold, copper and hot pink glitters with a sprinkle of holographic microglitter that holds everything together!

Pocket Money Polishes Brown Eyed Girl

Brown glitter is a real favourite of mine, and so is hot pink matt glitter, so this one presses all my buttons. I considered using a light pink base for this, but Char at SoYouBeauty has already done that (and it looks fantastic), so I decided I'd go for a more autumnal look effect with a pinky brown base. I used Rescue Beauty Lounge Bruised, which is somewhere between a brown and a plum depending on the light, and added a bit of simple water marbling with Pretty Serious The Pink One to accent the pink glitters in Brown Eyed Girl. Pretty Serious The Pink One is a stunning pink - click through to my post from a few weeks ago when I wore this on it's own to see just how bright it is!

Pocket Money Polishes Brown Eyed Girl


Pocket Money Polishes Brown Eyed Girl

Pocket Money Polishes Brown Eyed Girl

I wanted quite a heavy, glitter-bomb look for this mani, so I used two coats of Brown Eyed Girl. The glitter is perfectly suspended and applies smoothly and plentifully without any need for fishing or careful placement. The arrangement of glitter is just how it came out of the bottle. Because I'd put a lot of glitter on my nails, I used two coats of Gelous to make sure the mani is perfectly smooth and then a thick coat of Seche Vite to seal and dry.

Pocket Money Polishes Brown Eyed Girl

Pocket Money Polishes Brown Eyed Girl

Pocket Money Polishes Brown Eyed Girl


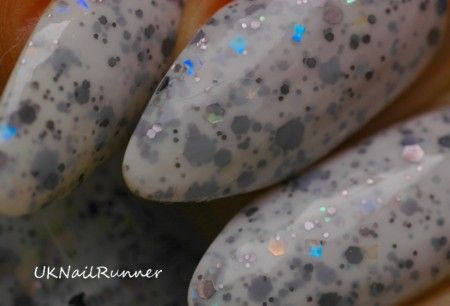
Brown Eyed Girl (and the other colours in the September Sparkle collection - which includes the black and white glitters Angels and Forever and the pretty blue Keep The Faith) go on sale at 6pm today at Pocket Money Polishes website. I was lucky to be able to buy a preview bottle of this last week. RBL Bruised is an old favourite from my stash (I got this in swap a while ago, if I remember correctly) and I purchased Pretty Serious The Pink One from Sally MagpiesLlarowe also stocks Pretty Serious polishes and ships internationally.

Thursday, 29 August 2013

Blue water marble with glitter (Pocket Money Polishes Keep The Faith)


Here's a manicure that evolved over a several days! I started out with plain, light blue nails - a sort of palate cleanser from all the glitter and nail art, lol! This is Zoya Blu - a really pretty light blue cream from Zoya's spring pastels collection earlier this year. I choose my colours by mood more than *season* as defined by the manufacturer!


Zoya Blu
Zoya Blu


Next day I added a water marble. I'm a relative beginner at water marbling, but I love the effect, so I've decided to try to a water marble every week to get more practice! In my last water marble I used just a single colour and clear polish to make a marbled pattern over a gradient, but this time I wanted to marble with several colours. I used Zoya Blu, Zoya Jacqueline, American Apparel Passport Blue and Rescue Beauty Lounge Cuprum.


It's not perfect of course, but I do like the way the patterns came out. RBL Cuprum worked in an interesting way, it spread really quickly and thinly over the water, and on the nail it looks a bit like a water colour wash.

My favourite nail was my middle finger on my left hand - here's a macro of that one. You can also see the coppery flecks in RBL Cuprum on the edge of my middle finger nail rather well in the macro. Although I like the fact that every nail turns out different in water marbling, I wish every nail came out as good as this. Obviously more practice is needed!


GLITTER, however, is great for covering imperfections! And because you can add it selectively, you can use it just to accent some areas of a nail art design:

Water marble with Pocket Money Polishes Keep The Faith


The glitter I used is Pocket Money Polishes Keep The Faith; this is a mix of slightly teal-ish blue glitters in hexes of various sizes, some tiny blue bar glitters and bigger pale gold holographic hexes. 


Pocket Money Polishes Keep The Faith
Pocket Money Polishes Keep The Faith 

I chose this glitter because the tone of blue matches up nicely with the blue shades in my water marble, and the pale gold hexes set off the warm cream of Zoya Jacqueline really well.

Water marble with Pocket Money Polishes Keep The Faith

Water marble with Pocket Money Polishes Keep The Faith
Water marble with Pocket Money Polishes Keep The Faith 

Zoya Blu and Jacqueline were part of a gift from a lovely polish friend, as was American Apparel Passport Blue. RBL Cuprum is a favourite from my stash - I got my bottle in a swap a while ago but the colour is still available to buy from the Rescue Beauty Lounge Website.

Charlie, the maker of Pocket Money Polishes, very kindly sent me Keep The Faith as a sample when I last ordered polish from her. Keep The Faith is one of the new Pocket Money Polishes colours for September, and goes on sale on 1st September at the Pockcet Money Polishes website, which includes a blog with information on new colours and release dates. You can also keep up with Charlie and her polishes on her facebook page


Thursday, 22 August 2013

Gradient and water marbling with Barry M Gelly Nail Paint in Key Lime, Greenberry and Lychee

Barry M Gelly Nail Paints in Greenberry, Key Lime and Lychee

The inspiration for this mani is straight from Sarah (Samarium's Swatches) fabulous guest post at Kelliegonzo yesterday. Water marbling is something I usually shy away from, I've not had much success in the past, it takes ages and can be messy.......... but's Sarah's mani was so awesome I just had to give it a go! 

Barry M Gelly Nail Paints in Greenberry, Key Lime and Lychee


I simplified Sarah's mani down quite a bit - I just used two colours for my background gradient, mostly so I wouldn't get carried away with the gradient and use it as an excuse to duck out of doing the water marbling! I used Barry M Gelly Nail Paint in Greenberry and Key Lime for my base - I applied one coat of Greenberry then sponged on a gradient of both colours using a damp make-up sponge. The Barry M Gelly colours are fab for nail art - the texture and pigmentation are great to work with. I've had great success with Lychee for giant dots and these two colours blended together wonderfully easily for this gradient!

Then I used a single colour along with a clear polish carrier (basecoat actually, as I don't have any clear polish) for my water marble. I wanted to create an overall pastel effect, so I chose Barry M Gelly Nail Paint in Lychee for this. I didn't bother with the holo topcoat Sarah used in her design, as I didn't think it would show up with all these light colours.

Barry M Gelly Nail Paints in Greenberry, Key Lime and Lychee

Barry M Gelly Nail Paints in Greenberry, Key Lime and Lychee


I like the end result; it reminds me of the zebra print stamping plates I like so much BUT each nail is different and kind of random, which I like better than the symmetry of stamping plates. The colour and shape of the Lychee strands reminds me of when I was a kid and I used to stretch chewing gum out and wrap it around things, lol!

The mani was fun to do if a bit messy! I did spill the bowl of water all over myself on the first nail and I didn't really master the technique of getting rid of the surplus polish-transfer thingy into the water before I took my nails out - so I ended up with a lot of polish all over my fingers and clean up was quite an undertaking. I'd definitely do water marbling again though - next time I might try a multi-coloured marbling over a white nail.......... I like Sarah's suggestion of practising water-marbling every week! Maybe Wednesday Water Marbles.

Barry M Gelly Nail Paints in Greenberry, Key Lime and Lychee

I think this was my favourite nail!

Barry M Gelly Nail Paints in Greenberry, Key Lime and Lychee

Barry M Gelly Nail Paints in Greenberry, Key Lime and Lychee


I puchased my Barry M Gelly Nail Paints from Boots.

And since this is a UK brand................