Gallery

  • Emily de Molly

    No Love Lost
  • High Elbow

    Crummock Water
  • Dots!

  • Pocket Money Polishes - I Want Candy

  • Pocket Money Polishes Magic

    Gradient: Chanel Paradoxal and Dior Waterlily
  • Emily de Molly - Serenity

  • Fellrunning

    Dryburn Moor
  • Elevation Polish - Opal

  • Darling Diva Polish - Serendipity

  • Derwentwater

  • Pocket Money Polishes - Summertime

  • Nail Lacquer UK

    Eat My Cake
  • Scofflaw - Whiskey Tango Foxtrot

  • Hodge

  • Chanel - Taboo and Peridot

  • Chanel - Bel-Argus and Azure


Sunday 24 November 2013

Indy's Indies Swatch and Review - Belle & The Snowman

Indy's Indies The SnowmanIndy's Indies Belle

Indy's Indies is a new brand to me - but I love matte glitters and circle glitters so when I saw her range I just *had* to try some! Today I'm showing you Belle, a mix of yellow and brown glitters, and The Snowman - black and white circles with shards of orange.

Let's start by looking at The Snowman:


Indy's Indies The Snowman

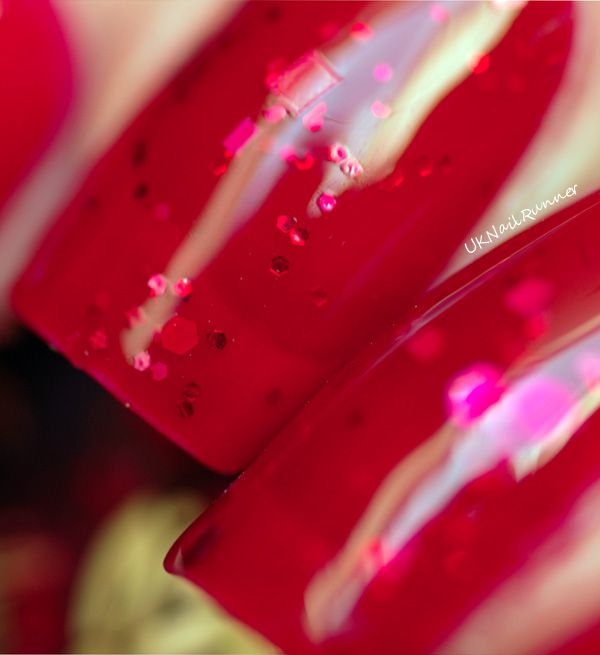
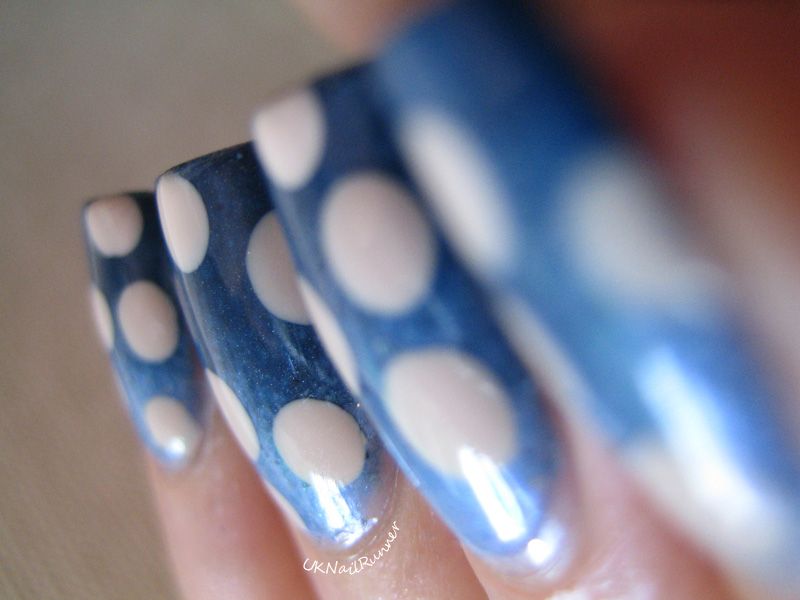
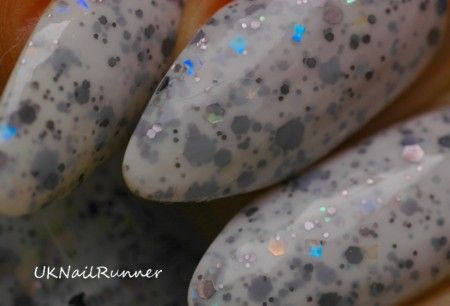
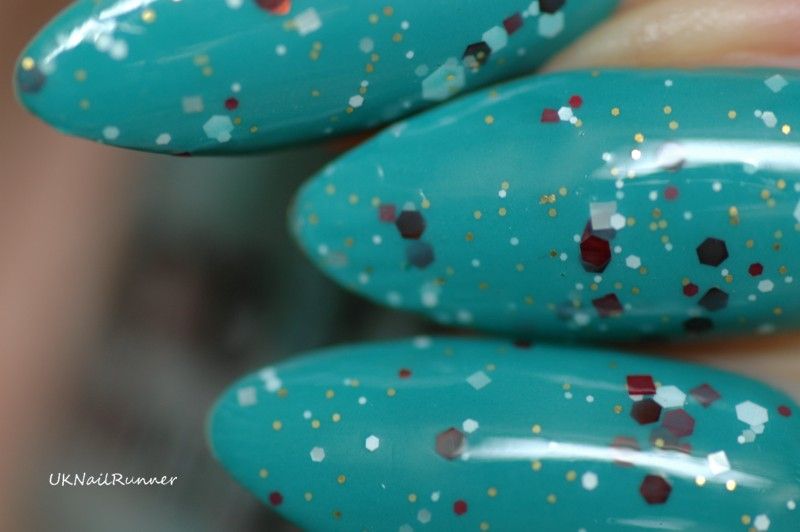
The Snowman has large white circles, smaller black circles and shards of orange in a clear base. There's lots of glitter in this polish, definitely no need for fishing to get glitter on your nails! I found The Snowman very easy to apply and I loved the effect it created over this dark blue (Rescue Beauty Lounge Dead Calm, my favorite dark blue ever, sadly discontinued now.) I finished this off with a coat of Gelous and Seche Vite quick drying top coat - you do need at least a couple of coats of topcoat over The Snowman to get a smooth finish as the circle glitters are quite substantial.

Indy's Indies The Snowman

Indy's Indies The Snowman


A bold design like this probably doesn't need a macro, but here's one anyway! Even if it's just to show I didn't do clean up, lol! Those of you who have Dead Calm will know this polish is impossible to clean up - it's best not to even try!

Indy's Indies The Snowman

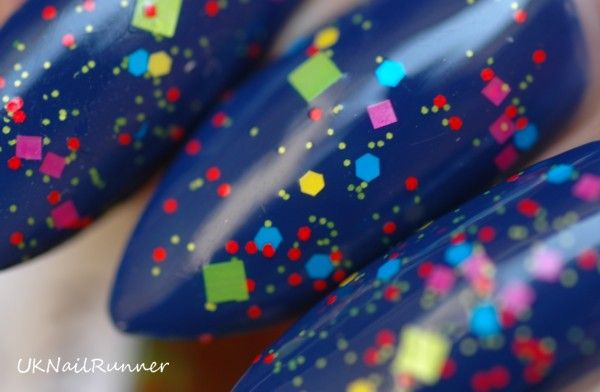
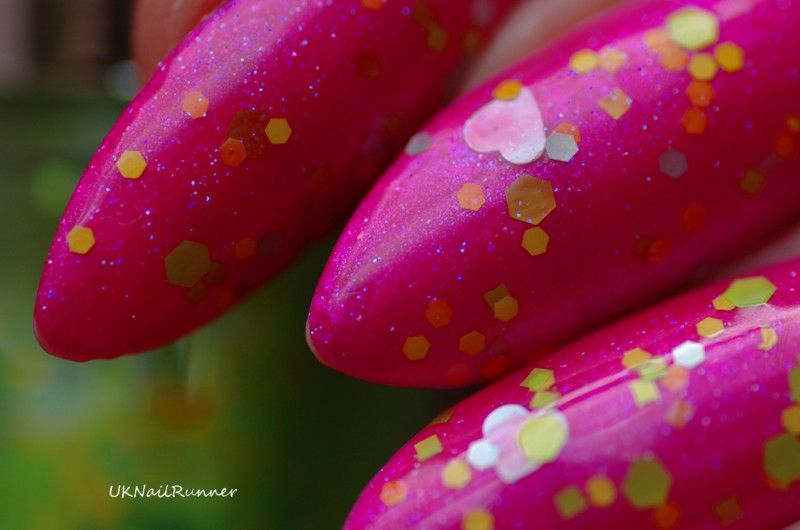
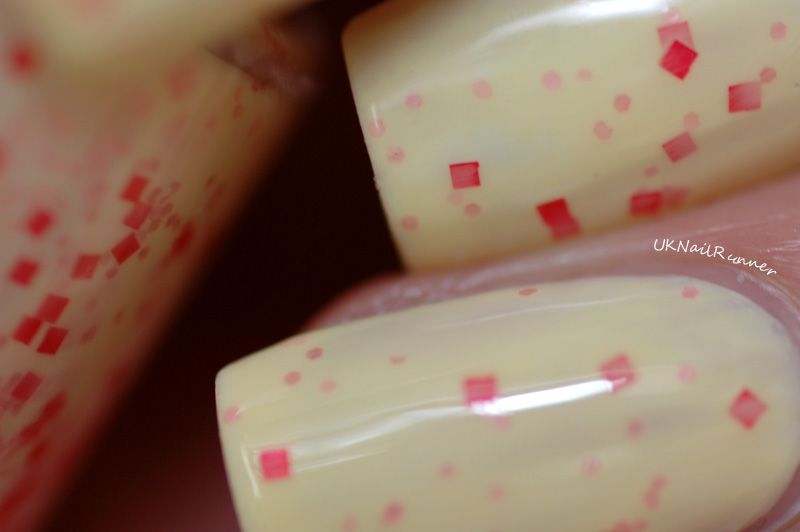
The other shade I want to share today is Belle. This is a super mix of deep and bright yellow circles and hexes, with the odd yellow flower and a sprinkle of deep brown hex glitter. I'm wearing Belle over a gradient of Lilypad Lacquers In The Milky Way and Enchanted Polish I'm Kind of a Big Deal. Again, the glitters in Belle are very generous and the polish applied very easily. As usual, I used a coat of Gelous to smooth the glitter and Seche Vite to finish off.

Indy's Indies Belle

Indy's Indies Belle

Indy's Indies Belle

Indy's Indies Belle

Indy's Indies Belle
Indy's Indies Belle

I'm really pleased with these two polishes - I'm giving this brand a big thumbs up! I have another couple of Indy's Indies glitters I'll be posting about soon.

I purchased The Snowman and Belle from Indy's Indies Etsy Shop. The other polishes are all from my personal collection.

Friday 15 November 2013

Splatter mani!

Splatter mani with M&S Autograph Ultimate Wear Bordeaux


This is the first time I've done a real splatter mani - I've used the splatter image from Konad plate M21 before but I thought it was time to go for the real thing, super-messy in a true Jackson Pollock style! I did the spattering over a mani that was a couple of days old - M&S Autograph Ultimate Wear Nail Colour in Bordeaux, a lovely deep, rich red. For the spattering I used American Apparel Hassid (black) and Cotton (pale cream); I poured out a little of each onto a milk bottle cap, sucked a bit up into a drinking straw and blew it out over my nails. I did all the cream spattering first, allowed this to dry, then went back over all the nails with black. This was great fun to do, and not anywhere near as messy as I thought it might have been. I painted my cuticles (and entire finger ends) with cuticle oil before I started, and this made clean up really easy.  

I love the results and I'll certainly do this again!


Splatter mani with M&S Autograph Ultimate Wear Bordeaux

Splatter mani with M&S Autograph Ultimate Wear Bordeaux

Splatter mani with M&S Autograph Ultimate Wear Bordeaux

Here are a few macro shots to show the splatteriness of my splatter!

Splatter mani with M&S Autograph Ultimate Wear Bordeaux


Splatter mani with M&S Autograph Ultimate Wear Bordeaux


Splatter mani with M&S Autograph Ultimate Wear Bordeaux

Sunday 10 November 2013

Quirk - Breast In Show (LE)

Quirk Breast In Show

This polish was my prize from the lovely Kerrie at the new UK Indie brand Quirk Polish for her nail art competition. The competition was for a pink mani to mark Breast Cancer Awareness Month in October - this mani was my entry. I was so pleased to win this!! And Breast In Show is a gorgeous polish too - it's a mix of tiny square glitter (I love square glitter) in a range of pinks:

Quirk Breast In Show


I used one coat of Nicole by OPI Our Fuschia's Looking Bright as a base for this mani - probably unnecessary as I'm sure Breast In Show would give full coverage in two or maybe three coats, but when I'm wearing full coverage glitters I like to have something to wrap my tips with and to give a crisp edge around my cuticles. NOPI OFLB was just the first fuschia I put my hand on - no other reason for choosing it. This is two coats of Breast In Show with a coat of Gelous and two coats of Seche Vite to smooth it out. Glitters like this always need plenty topcoat.

Quirk Breast In Show

Quirk Breast In Show


Quirk Breast In Show


These macros are taken with my DSLR and the light where I have it set up has given the polish a slightly warmer colour ~ in real life the mani is more like the pictures above (on my screen anyway).

Quirk Breast In Show

Quirk Breast In Show

Quirk Breast In Show


I wore Breast In Show alone yesterday and most of today, but I've just added a little stamping to tone down the sparkle for work in the morning. I used Barry M Matte Polish in Caramel (I've been wanting to test the Barry M Mattes out for stamping and the answer is yes, they stamp great) with a zebra design from the Cheeky 'Wild at Heart' Jumbo plate. The images on the Cheeky Jumbo plates are perfect for my nails at their current length - some of my Konad and BM plates are too short, and I don't consider my nails long right now.

Quirk Breast In Show stamped with Barry M Matte Caramel and Cheeky Wild At Heart Jumbo plate

Quirk Breast In Show stamped with Barry M Matte Caramel and Cheeky Wild At Heart Jumbo plate

Quirk Breast In Show stamped with Barry M Matte Caramel and Cheeky Wild At Heart Jumbo plate


Overall, I love Breast In Show - thank you so much Kerrie! This polish was a special for the nail art competition, but Kerrie's other polishes are available at Sally Magpies. I'm kicking myself that I didn't buy Peace is Free before it sold out! I bought Barry M Matte Polish in Caramel from my local Boots and the Cheeky Jumbo plate from Amazon. Cheeky plates ship from China, but mine only took a couple of weeks to get to the UK.

Monday 4 November 2013

Pink Spotted Scrunch - Nail Art with Pretty Serious The Pink One and Bourjois Sunny Sunday

Pretty Serious The Pink One and Bourjois Sunny Sunday


A Pink Spotted Scrunch, according to Roald Dahl, is a venomous creature that can eat a person in one bite. I had this idea for a wildly exotic pink spotted mani during a Roald Dahl themed art lesson with a bunch of nine year olds a couple of weeks ago. OK, it turned out more like an exotic nudibranch (Ceratosoma amoena, photo credit Doug Anderson - more pictures here of the little darling) than an evil maneater, but I love it all the same.


Pretty Serious The Pink One and Bourjois Sunny Sunday


Not too much to say about the technique, I applied one coat of Bourjois Sunny Sunday, then added the sponge gradient with Sunny Sunday and The Pink One. I reversed the gradient on one nail of each hand for a bit of extra interest. Pink dots (large) on the yellow areas of the mani and small yellow dots on the pink areas. I chose these shades because they are the densest, most pigment rich yellow and pink in my whole collection, so I knew they would work well for both gradient and dots. The Pink One has the extra advantage of a super blue shimmer, which blends wonderfully in the gradient and adds a great highlight to the big pink dots.

Lots of pictures at various angles follow!

Pretty Serious The Pink One and Bourjois Sunny Sunday

Pretty Serious The Pink One and Bourjois Sunny Sunday

Pretty Serious The Pink One and Bourjois Sunny Sunday


Pretty Serious The Pink One and Bourjois Sunny Sunday

Pretty Serious The Pink One and Bourjois Sunny Sunday

Pretty Serious The Pink One and Bourjois Sunny Sunday

Pretty Serious The Pink One and Bourjois Sunny Sunday

Pretty Serious The Pink One and Bourjois Sunny Sunday

Pretty Serious The Pink One and Bourjois Sunny Sunday

Pretty Serious The Pink One and Bourjois Sunny Sunday

The icing on the cake with this mani is that just after I'd finished it, I noticed that new UK Indie brand Quirk had a nail art contest for a pink mani........... I entered a picture of this mani and won the contest! My prize is an exclusive Quirk polish - I'll be showing pictures of it as soon as it arrives.

Pretty Serious The Pink One is a tremendous pink - one of my absolute favourites. Here are my swatches of it alone  (when my nails were much longer), with contrasting (green and yellow) glitter and used in a water marble - yes, it's opaque enough to hold up to watermarbling over a dark base. I purchased my bottle of The Pink One from Sally Magpies earlier this year - I believe the colour is still current but very popular so it sells out quickly. I purchased Bourjois Sunny Sunday earlier this year from Boots - if you like yellows but hate the fact that most of them are streaky and difficult to apply then this one is well worth looking at.

Friday 1 November 2013

Tape design nail art with Barry M Countess


Barry M Countess
Barry M Countess


If you're in the UK and you haven't bought Barry M Countess yet............ you ought to! This is my favourite textured glitter polish to date! I've already shown it shiny with topcoat and a glitter topper (Femme Fatale Hydraxia) but I wanted to use it in a nail art design to showcase it's texture, rather than just wearing it as a straightforward mani.

I applied a vampy base (Nicole by OPI Smile For The Glam-era, although I probably have half a dozen *similar* colours that would work equally well), topped it off with Seche Vite to get maximum shine then applied striping tape in a random pattern. I added a single, thickish coat of Countess and removed the tape before Countess dried. I worked on just one nail at a time here - I found I got the best edges on the textured polish by removing the tape as quickly as possible. The effect is subtle, but definitely noticeable - I got several real-life complements when I wore this! However, I  might like to repeat this mani with either a very light base, perhaps a creamy nude or off-white, or a bright colour for a variation on the theme.

Barry M Countess

Barry M Countess

Barry M Countess


Barry M Countess
Barry M Countess

Here's a macro in full sun - the texture of Countess looks like sugar crystals <3

Barry M Countess
Barry M Countess

I purchased Barry M Countess from my local Boots.