Gallery

  • Emily de Molly

    No Love Lost
  • High Elbow

    Crummock Water
  • Dots!

  • Pocket Money Polishes - I Want Candy

  • Pocket Money Polishes Magic

    Gradient: Chanel Paradoxal and Dior Waterlily
  • Emily de Molly - Serenity

  • Fellrunning

    Dryburn Moor
  • Elevation Polish - Opal

  • Darling Diva Polish - Serendipity

  • Derwentwater

  • Pocket Money Polishes - Summertime

  • Nail Lacquer UK

    Eat My Cake
  • Scofflaw - Whiskey Tango Foxtrot

  • Hodge

  • Chanel - Taboo and Peridot

  • Chanel - Bel-Argus and Azure


Wednesday 27 February 2013

OPI Lights of Emerald City - Swatch and review

I'm not sure if I like this polish or not. I love square glitter, and I love matt white glitter, and I love iridescent glitter - so all the parts are there for me ~ I'm just not sure about how this fits together as a whole.

Most of the swatches I've seem have been over light pinks, in particular OPI I Theodora You, the baby pink from the OPI Oz Collection. The PolishAholic did her swatch of Lights of Emerald City over this one - take a look here the polishaholic OPI-Disney Oz The Great And Powerful Collection Swatches & Review. So I choose to swatch over a couple of darker colours - Elevation Polish Colline du Charf and Essie Power Clutch. I took my pictures in the low light of late afternoon to try capture the sparkle of the iridescent glitter.

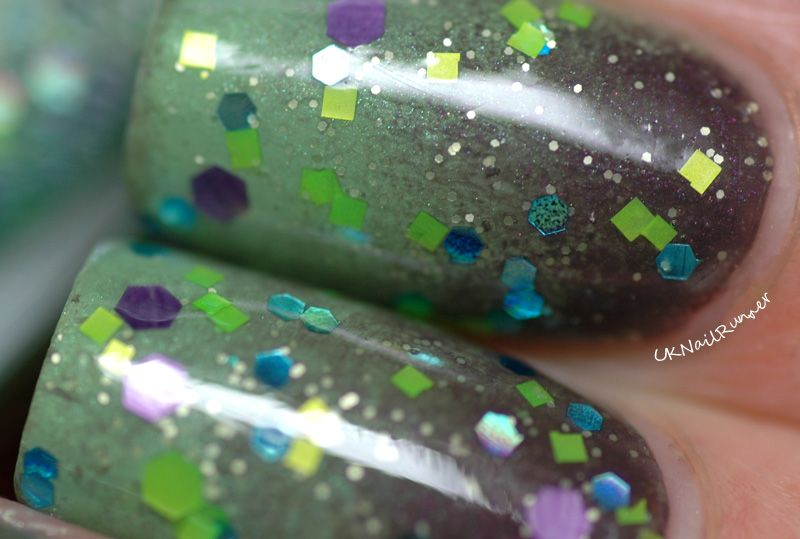
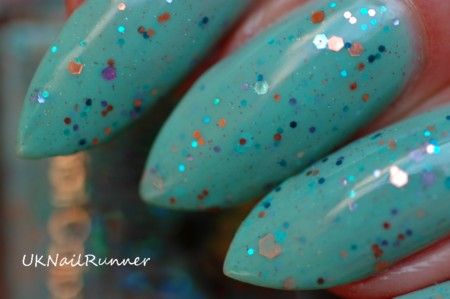
Here is Lights of Emerald City over Colline du Charf
OPI Lights of Emerald City

OPI Lights of Emerald City

OPI Lights of Emerald City
OPI Lights of Emerald City over Elevation Polish Colline du Charf

It looks OK from a distance I guess, and I love how the smaller glitters glow and twinkle. My problems are with the white glitters - maybe they are bit too big? - but whatever, I think they make the polish look a bit tacky. And there are some practical issues with them; because they are big, and flat, they don't lie well on my nails, they stick out a bit and are kinda funny looking, like how post-it notes don't lie flat on what you stick them to! I thought this was because my nails have a very high c-curve, but when I looked carefully at the Swatchaholic's pics again, it looks the same on her nails. And there's a quality problem with these white glitters too - they haven't cut properly so a lot of them have got a little extra tag on the corner - ugh!

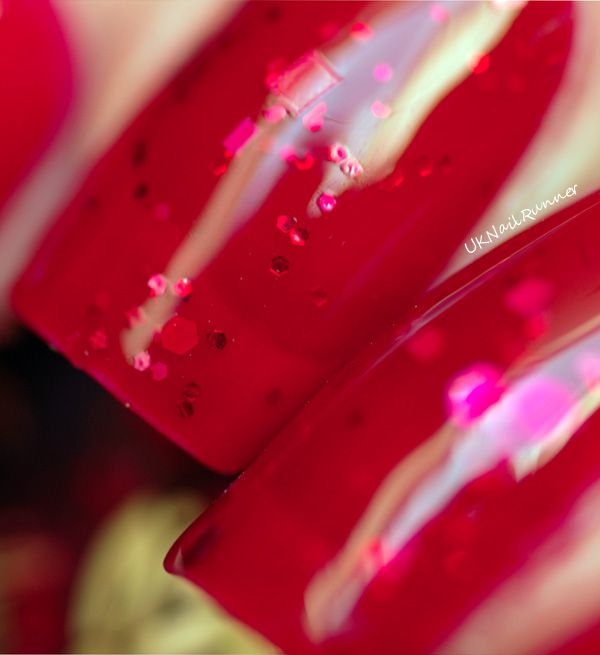
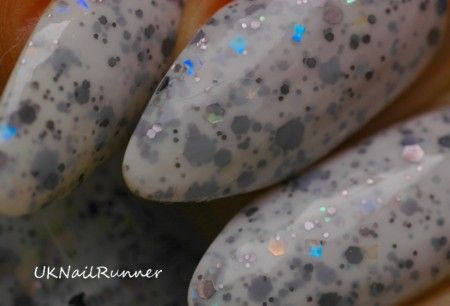
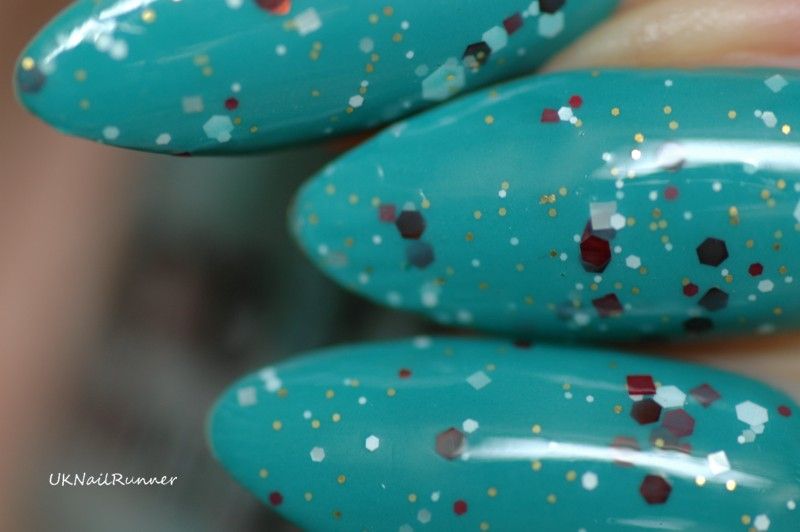
Here it is over Power Clutch:
OPI Lights of Emerald City

OPI Lights of Emerald City

OPI Lights of Emerald City
OPI Lights of Emerald City over Essie Power Clutch

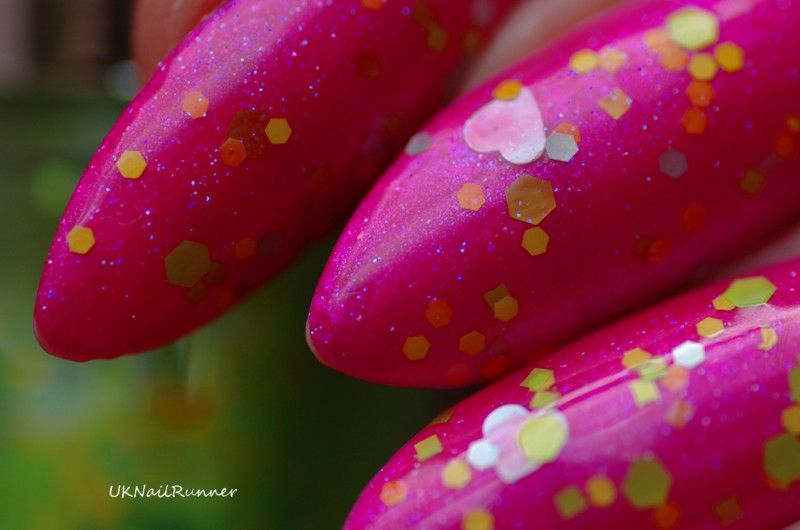
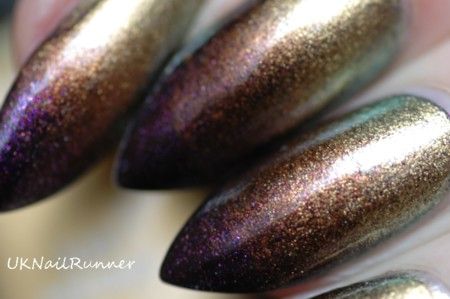
A couple of blurry ones for fun to show the rainbows in the iridescent glitter:

OPI Lights of Emerald City

OPI Lights of Emerald City
OPI Lights of Emerald City over Essie Power Clutch

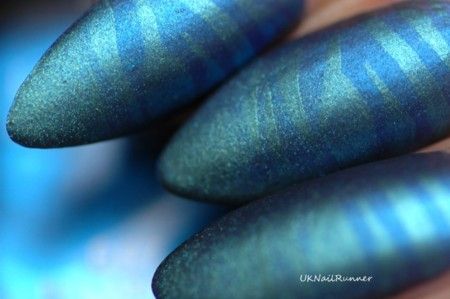
And a macro (well the best I can do for a macro with my little camera so you can see properly the tags on the white glitters and how they don't lie flat to the nail).

OPI Lights of Emerald City
OPI Lights of Emerald City over Essie Power Clutch

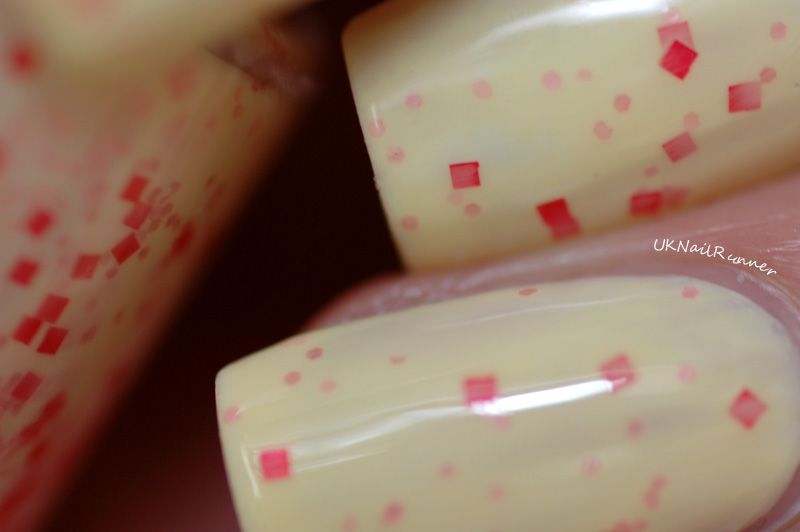
Both the colours I used as bases for these swatches are beautiful in their own right so it's only fair to show them on their own! Here's Elevation Polish Colline du Charf, this is a difficult colour to describe but it's a sort of light dusty taupe with a lavender tinge.

Elevation Polish Colline du Charf


Elevation Polish Colline du Charf

Elevation Polish Colline du Charf

It has a slightly jelly finish, I took the pics above without topcoat just before I put the OPI on. This is two coats.

Essie Power Clutch is a classic and I love it. If it's not a staple in your collection, it should be! This is three coats with SV.
Essie Power Clutch

Essie Power Clutch

Essie Power Clutch
Essie Power Clutch


What do you think about OPI Lights of Emerald City - are the white glitters too big?

I purchased OPI Lights of Emerald City from a seller on Amazon.co.uk. Elevation Polish Colline du Charf is available directly from Lulu at her website here http://elevationpolish.bigcartel.com/product/colline-du-charf and Essie Power Clutch is readily available from shops and on-line stores.

I've also posted a review and pictures of OPI Lights of Emerald City with some light green polishes :)


Monday 25 February 2013

Elevation Polish Street Side NYC with Alta Costura Vernis Squared

Alta Costura Vernis Squared is one of my favourite glitters. I love matt glitters, and the squares make this one quite unusual. It's packed full of a whole rainbow of colours, which make it really easy to pair with any base colour.

I was feeling a need for something a bit adventurous today, so I decided to use a yellow base. I love yellow, but it is a difficult colour to wear. Also, a lot of yellow polishes can be difficult to apply. I can't wear a true primary yellow with my skintone, but if the yellow leans either towards mustard or lemon I'm fine with it.

The yellow I chose for this mani was Elevation Polish Street Side NYC. This one has a definite mustard tinge; Lulu's description says it was inspired by New York taxicabs, and the slightly dusty mustard conjures up a perfect image of yellow cars in a busy city. The polish has just a hint of a coppery microflakie running through it, and the formula is great - often yellows can be notoriously streaky. As a general rule with yellow, I usually apply two coats, then a coat of Seche Vite to help even out any streakiness before the final coat. So here I applied a coat of SV to Street Side NYC before the glitter. As you can see the polish is pretty much perfect at two coats plus topcoat, no streaking in sight:

Elevation Polish Street Side NYC

Elevation Polish Street Side NYC

Elevation Polish Street Side NYC

Here it is with ACV Squared. I always find a glitter over a hard-to-wear colour breaks the colour up a bit and brings the colour back into my comfort zone. That said, my comfort zone is pretty broad and I didn't feel at all self-conscious with this mani. I used two coats of the glitter polish, then two coats of Gelous and a further thick coat of SV to smooth everything out. Some of the glitters are quite big, and they are square, so I needed to do just a little bit of manipulation to get them to lie flat on the nail. I wouldn't say this is a difficult glitter to apply at all though, and well worth the effort. Another thing I'd add about ACV Squared is that although the bottle I have is over six months old, there is no bleeding of the glitter into the base or any curling of the glitters themselves - this is a problem I've noticed with some indie polishes.

Elevation Polish Street Side NYC with Alta Costura Vernis Squared

Elevation Polish Street Side NYC with Alta Costura Vernis Squared

Elevation Polish Street Side NYC with Alta Costura Vernis Squared

Elevation Polish Street Side NYC with Alta Costura Vernis Squared

I bought Elevation Polish Street Side NYC from Lulu at her website here elevationpolish. I got my bottle of ACV Squared from a polish friend in the USA - Nikki, the creator of ACV, has an Etsy shop but I think her production is quite small and I've never caught a restock.She doesn't have any stock currently but I did have an e-mail conversation with her a few months ago (November 2012) and she said she was planning to come back with more polishes so I'm still hopeful - here's a link to her blog http://myinvanity.blogspot.co.uk/.

Do you like yellow polishes? What shades of yellow do you find easiest to wear?

Saturday 23 February 2013

OPI Lincoln Park After Dark Suede with L'Oreal Confetti

I was excited to hear about L'Oreal Confetti - I love black and white matt glitters, and although I have a few different ones from various indie brands, the idea of just being able to walk into Boots and buy this off the shelf without all the hassle of indie restocks and international shipping is a bit irresistable :)

I chose an unusual base for this, because I've yet to find a colour that doesn't work well with black and white glitter! I love anything with a matte finish, and the OPI Suedes are great; they have a sort of metallic-matte-velvet finish which is quite unique. They were released back in 2009 as a limited edition so dusty-hunting, swaps and ebay are probably the best way to find them now. Lincoln Park After Dark Suede is not just a matte version of Lincoln Park After Dark - it's altogether lighter and more complex. Scrangie describes it as a 'matte eggplant with an outrageous shimmer' and I'd entirely agree with that.

Here's LPAD Suede on it's own to begin with
OPI Lincoln Park After Dark Suede

OPI Lincoln Park After Dark Suede

OPI Lincoln Park After Dark Suede
I love this colour and finish. It reminds me of burnished metal, or hammerite paint. This is three coats, no base or topcoat. It is easy to apply. The finish on the Suedes is quite delicate, you  can't expect long wear and after a day or so they do start to take on a more satiny finish, especially if you apply hand cream regularly.  I took these pictures after about a day of wear; I wanted to enjoy LPAD Suede on it's own for a while before playing around with glitter.

Here is LPAD Suede with L'Oreal Confetti on top. The sun sneaked out for a moment while I was taking these pictures, and I think LPAD Suede is more true to life here; the pictures above lean a bit towards blue-purple. Sorry about that.
OPI Lincoln Park After Dark Suede with L'Oreal Confetti

OPI Lincoln Park After Dark Suede with L'Oreal Confetti

L'Oreal Confetti is black and white hexagonal glitters of several sizes in a clear, very lightly shimmery base. I used two coats to get this density of glitter, but if you want a sparser effect, it's perfectly even at one coat. The bottle is small (5ml) but it's a nice big flat brush so you can easily sweep the glitter across the whole of your nail without needing to dab. Another good thing is how well the glitter is suspended - if you use indie glitters regularly you'll know all about sinking glitter, glitter sticking to the sides of the bottle and the need to fish the glitters out of the bottle. None of these problems here - application of L'Oreal Confetti is very easy :)

L'Oreal Confetti dried sort of semi-matt with some brush strokes visible. Not a big problem for me, as I always smooth out a glitter mani with top coat anyway. I used one coat of Gelous followed by a thick coat of Seche Vite. When you add a shiny top coat to the OPI Suedes, they take on a new life all of their own, with lots of shimmer and sparkle! The blurry picture below shows this up better:

OPI Lincoln Park After Dark Suede with L'Oreal Confetti

However, I love my matte finishes so I couldn't resist adding a matt top coat (I used Mavala Color-Matt) to the finished mani:
OPI Lincoln Park After Dark Suede with L'Oreal Confetti
OPI Lincoln Park After Dark Suede with L'Oreal Confetti (mattified)
I believe this just about brings LPAD Suede back to it's original finish, and I think the glitters in L'Oreal Confetti stand out much better without the distraction of the glossy topcoat. The last couple of pictures are at different angles to show the velvety effect of the finished mani.
OPI Lincoln Park After Dark Suede with L'Oreal Confetti

OPI Lincoln Park After Dark Suede with L'Oreal Confetti

I bought L'Oreal Confetti from Boots. There were three other top coats in the range, shimmers in gold, silver and blue ~ did anyone try any these yet?

Thursday 21 February 2013

Barry M Textured Nail Effect Kingsland Road

This is the second of my Barry M Textured polishes - it's a soft, frothy shell pink that works rather nicely with the textured effect.

I've taken a few pictures with light from different angles to show the texture and colour ~ I'm finding textured polishes quite hard to photograph, my camera struggles to get all nails in focus and this shows up more with the texture.

One thing I have noticed with the Barry M Textured polishes is that the texture effect takes a while before it really looks its best, probably a couple of hours - before then it looks rather shiny - so if you decide to try these give them a bit of time before concluding whether or not you like them!.

This is three coats. The polish applies really easily, but do give it a moment to dry properly between coats to avoid it dragging and clumping. Clean up is also very easy. I like this colour a lot - it's very soft and feminine!

BarryM-Textured-Nail-Effect-Kingsland-Road

BarryM-Textured-Nail-Effect-Kingsland-Road

BarryM-Textured-Nail-Effect-Kingsland-Road

BarryM-Textured-Nail-Effect-Kingsland-Road

I'm starting to really like texture! It's hard to resist constantly stroking my nails and rubbing them together. It makes me think of stridulation - when insects rub textured bits on their bodies together to make a chirruping sound. We keep a few lizards and by necessity, crickets to feed them with - crickets are notorious for escaping and I often wake up in the night to hear a chorus of chirruping. I'll be able to join in now with my textured nails!

I purchased Kingsland Road from Boots (they're also on sale at Superdrug and from Barry M's website).

Tuesday 19 February 2013

Elevation Daisen over Rescue Lounge Abiquiu

Elevation Polish Daisen and Rescue Beauty Lounge Abiquiu
These are two of my favourite colours from two of my favourite brands!

Rescue Beauty Lounge Abiquiu is slightly dusty parrot green; Elevation Daisen is a mix of light pink circular glitters with a sprinkle of fine multi-coloured iridiscent glitter in the background.
Elevation Polish Daisen and Rescue Beauty Lounge Abiquiu

 If you just focus on the bottle of Abiquiu for a moment you can see there is a tiny bit of shimmer in there, but this doesn't really translate onto the nail. This is good for me, because generally I prefer a cream finish!

Elevation Polish Daisen and Rescue Beauty Lounge Abiquiu
Blurring slightly and with light from a different angle shows the background holo glitter in Daisen

Elevation Polish Daisen and Rescue Beauty Lounge Abiquiu

Elevation Polish Daisen and Rescue Beauty Lounge Abiquiu

I used two coats of Abiquiu and two coats of Daisen to achieve this effect. Daisen has quite a thick base, almost like a jelly, and the glitter sort of 'suspends' in it to create a nice effect. I used one coat of Gelous followed by a thick coat of SV to smooth everything out.

Rescue Beauty Lounge Abiquiu was part of the Georgia On My Mind collection released in 2012 - these were a series of colour inspired by the work of Georgia O'Keefe. I believe Abiquiu (now renamed Abi because of a copyright issue) is still available from RBL at their website http://www.rescuebeauty.com/nail-polish/abi-na.html, along with reviews, information and links to more blog posts about the colour. I received my bottle of Abiquiu in a swap with a fellow polish enthusiast.

Daisen is (quite rightly, in my opinion) one of Elevation's more popular colours and sells out quickly - but Lulu does keep restocking it. You can buy Elevation polishes at Lulu's website http://elevationpolish.bigcartel.com/ and she posts about restocks, new colours etc in her blog http://lovebrownnailpolish.wordpress.com/category/elevation-polish/. I received my bottle of Daisen in a swap too.

Monday 18 February 2013

HARE Heat Plague

This is two coats of HARE Heat Plague over Nubar Forest. Nubar Forest is one of my favourite dark green creams.

I used a coat of Gelous and a coat of SV to smooth this out. Nothing more to say - I love this combination of colours :)

HARE Heat Plague
HARE Heat Plague

HARE Heat Plague
HARE Heat Plague

HARE Heat PlagueHARE Heat Plague
HARE Heat Plague

You can buy HARE polishes from Llarowe llarowe hare page. They ship internationally at a very fair price and have great customer service. Nikole sells her polishes direct from her Etsy shop too HAREpolish.

Colour geek notes - why do the colours in this polish work so well?
Nikole has done all the work already in this polish and applied her colour theory very well! We've got a green base with violet and orange glitters ~ orange, violet and green are equally spaced on the colour wheel so the effect is balanced. The technical term for three colours like this is a triad. 

Compare this to the HARE Polish Afterglow (look at PolishAholic swatches as I swapped my bottle away without taking photographs), which uses the same glitters in a blue base. I would have liked Afterglow much better if she'd used a yellow glitter rather than the purple ~ just my opinion of course, feel free to disagree!


beautybay is the easiest way to buy Nubar in the UK.

Saturday 16 February 2013

Textured effects - Nails Inc London Wall + Barry M Atlantic Road


I had to try these! I *think* I like them, but I'm still deciding! I bought one colour from the Nails Inc Concrete range (London Wall), and one from the Barry M Textured Nail Effect range (Atlantic Road). Whatever the trick in the formula is, both are very similar, and distinctly weird! The polish goes on smooth, then as it dries, it starts to bubble and create the textured effect

First the Nails Inc. - I struggled with this; these pictures are my second attempt at application, and it's still not right. The first coat went on fine, but then the second sort of dragged and clumped into horrible lumps. I decided the polish was too thick, so I added a couple of drops of thinner. I also noticed that London Wall is exactly the same shade as Porchester Square, so I used one coat of Porchester Square as a base. My result with the second attempt at application was better, but I'm still not entirely convinced I like it very much. The main problem I have is that the finish is rather shiny - I wanted it to be matt. I wore it for 24 hours, and I have to admit it was growing on me.


Nails Inc Concrete London Wall

Nails Inc Concrete London Wall


Then I tried the Barry M. The formula on this is MUCH better, it went on more smoothly; it's thinner so I used three coats but there was no clumping. It also dried almost matt. The bubbled texture seems much denser and finer on this one than on the Nails Inc., which I much prefer. I love the colour too. Also, it's about a third of the price of the Nails Inc!


Barry M Textured Nail Effect Atlantic Road


And finally, an accent nail of Nails Inc London Wall with Barry M Atlantic Road. Three coats of London Wall; I think I'm getting the hang of applying the Nails Inc now. But it's still shinier than the Barry M and the bubble texture effect is less even.


Barry M Textured Nail Effect Atlantic Road Nails Inc Concrete London Wall

In this closer shot you can see that even with three coats of London Wall, it still has a more open and less matt finish that Atlantic Road.

Barry M Textured Nail Effect Atlantic Road Nails Inc Concrete London Wall

I think Barry M is the clear winner here. I'll probably get the pink and maybe the green Barry M textured effect polishes too, but I doubt I'll buy any more of the Nails Inc Concrete range.

I purchased Nails Inc London Wall from the Nails Inc counter in an independent UK department store, and Barry M Atlantic Road from Superdrug.