Gallery

  • Emily de Molly

    No Love Lost
  • High Elbow

    Crummock Water
  • Dots!

  • Pocket Money Polishes - I Want Candy

  • Pocket Money Polishes Magic

    Gradient: Chanel Paradoxal and Dior Waterlily
  • Emily de Molly - Serenity

  • Fellrunning

    Dryburn Moor
  • Elevation Polish - Opal

  • Darling Diva Polish - Serendipity

  • Derwentwater

  • Pocket Money Polishes - Summertime

  • Nail Lacquer UK

    Eat My Cake
  • Scofflaw - Whiskey Tango Foxtrot

  • Hodge

  • Chanel - Taboo and Peridot

  • Chanel - Bel-Argus and Azure


Friday 30 August 2013

Nelly Polish - Jonah's Green and Looe


Nelly Polish - Looe and Jonah's Green

I have a couple of polishes from another new UK Indie brand to show you today - Nelly Polish. Nelly Polish is a little different to other polishes in that it can be purchased either as ready mixed polish or as powder to mix with your own clear polish. The idea behind this is so that the polish can be shipped out of the UK without infringing our (newly) very strict mail regulations. I opted for the ready made polish, but other bloggers have reviewed the powder mixture - have a look at Debbie Crumpet's post which explains the whole background to the idea and includes an interview with Hilary, the maker.

The Nelly Polish range are all jelly colours, hence the name - jelly nail polish  ~ *Nelly Polish*. Cute!  The bottles and labels are also super cute too!

Nelly Polish - Looe and Jonah's Green

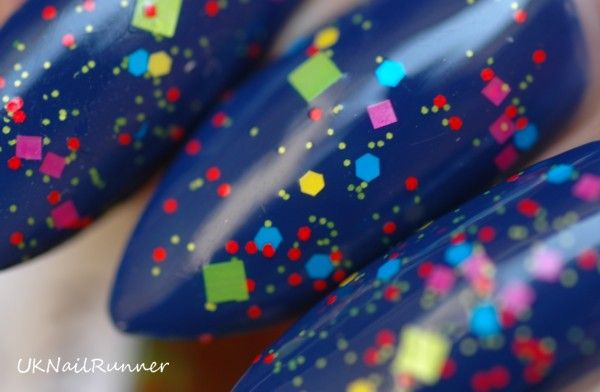
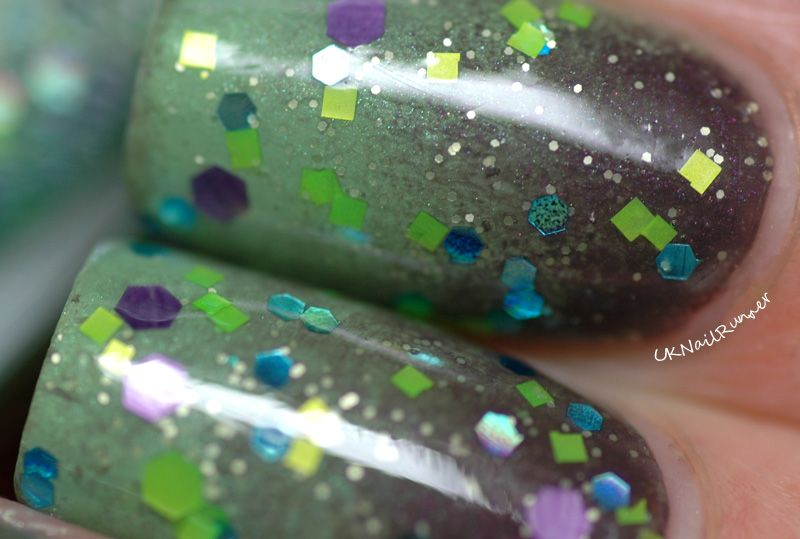
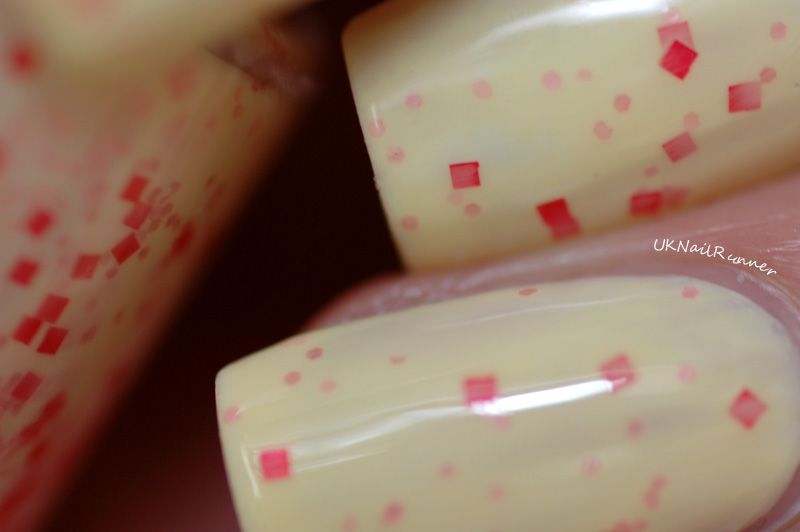
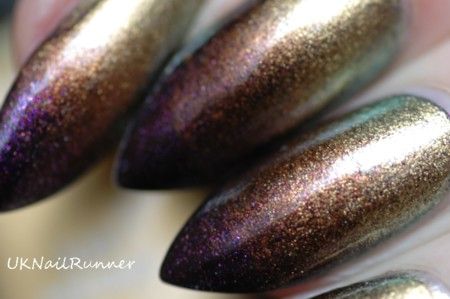
My first choice was Jonah's Green. Named after Hilary's son Jonah, who came up with the colour. This is a rich jade green / aqua with gold holographic glitter of various sizes. I'd say the base is a bit more creamy than most jelly polishes - maybe we should call this one a crelly!

Nelly Polish  Jonah's Green
Nelly Polish  Jonah's Green

I'm usually a bit wary of jelly polish on it's own (just because my nail beds are all different lengths, so I have to make my nails look even by varying the length of free edge), although I love them for layering. However, Jonah's Green looked dense enough for me to try it alone. This is just two coats, with a layer of Gelous to smooth the glitters out and a layer of Seche Vite to finish. Before I added the topcoats, the finish was quite *rubbery* rather than high shine, but I don't think this matters at all since topcoat is definitely needed to smooth the glitters out in any case.

Nelly Polish  Jonah's Green

Nelly Polish  Jonah's Green


I love the colour and finish on this - you can see in the macro shots how the glitter takes on lots of depth and variation in the base. I think Jonah has great taste in colour :)  I seem to have picked up a few odd reflections in these macros; sorry about that, but my nails are smooth!


Nelly Polish  Jonah's Green

Nelly Polish  Jonah's Green

Nelly Polish  Jonah's Green
Nelly Polish  Jonah's Green

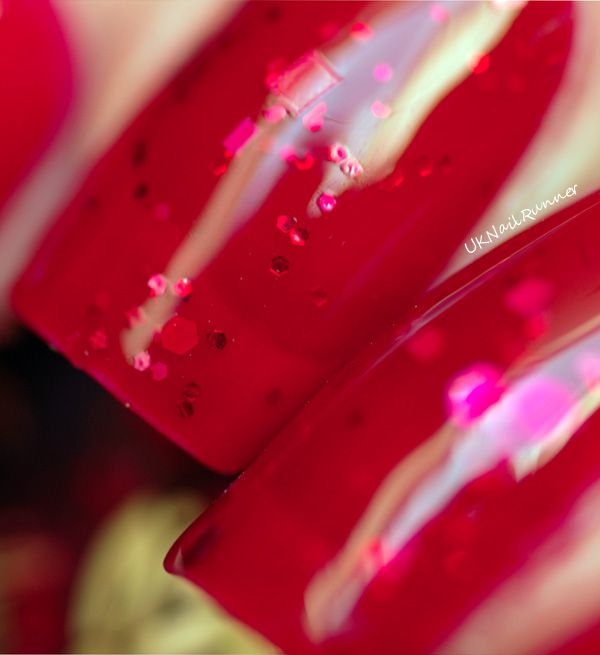
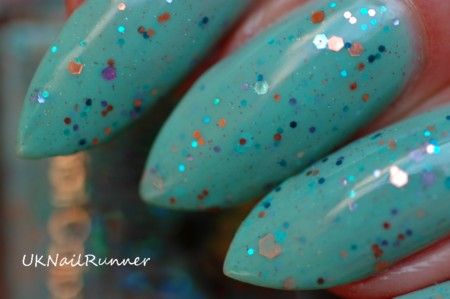
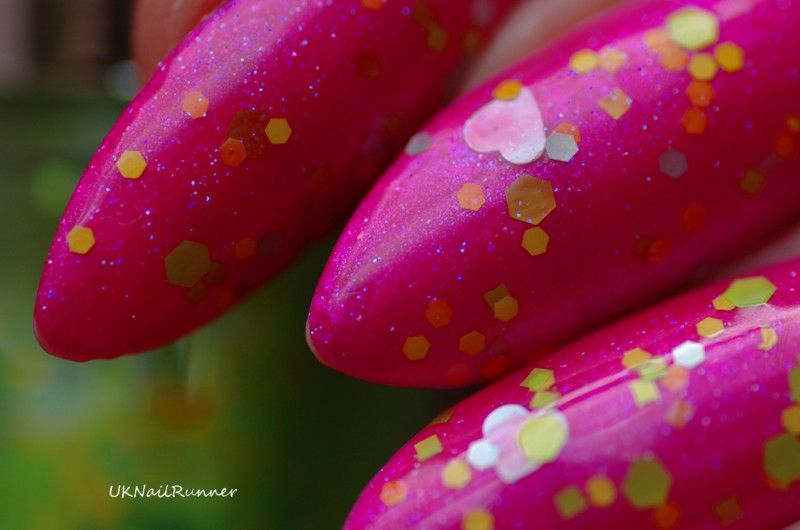
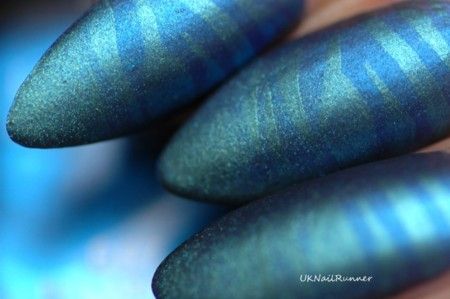
The second colour I tried is Looe. I love pink and green together, so this made it an obvious choice for me. That and memories of a childhood holiday in Looe when I was about nine. Looe is in Cornwall, which is a long way from home (well, in the UK scale of things it is) - what I remember most is how long it seemed to take to get there and seeing sharks being landed on the harbour!

Looe is much more of a jelly than Jonah's Green; it includes matt hexagonal glitters (I love matt glitters) of various sizes in a deep raspberry pink and small ones in yellow.


Nelly Polish Looe
Nelly Polish Looe

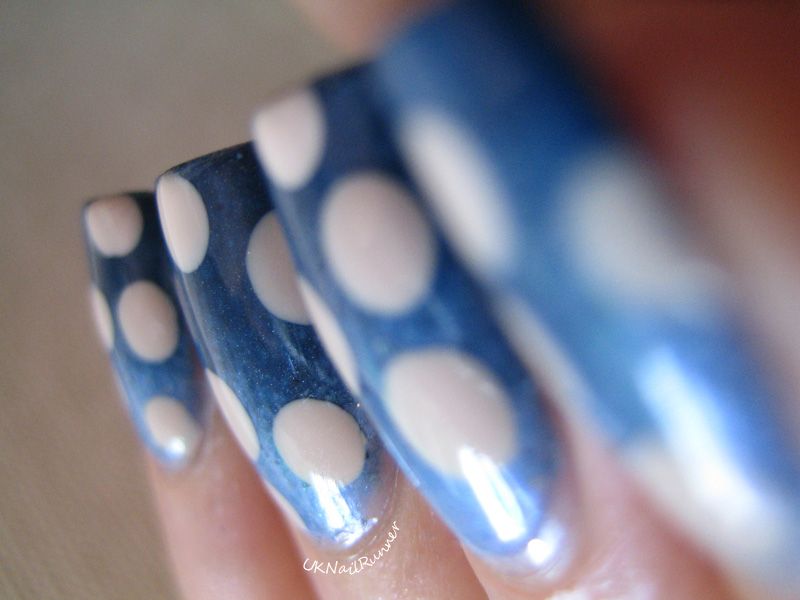
I decided to layer this over another green - I liked effect Kerrie at PishPosh and Polish got by layering Looe over Barry M Spring Green but I didn't want to copy her exactly so I choose a lighter, brighter green ~ Barry M Gelly Nail Paint in Key Lime. I used one coat of Key Lime, two coats of Nelly Polish Looe, a coat of Gelous and a final coat of Seche Vite for this mani. The glitters in Looe are smaller than those in Jonah's Green, and lie very flat and smooth to my nails.  I love the colour of the base and how the glitters contrast with it!


Nelly Polish Looe

Nelly Polish Looe


And a few macro shots to show the glitter in a bit more detail:

Nelly Polish Looe

Nelly Polish Looe

Nelly Polish Looe
Nelly Polish Looe

I purchased Nelly Polish Jonah's Green and Looe from Hilary at her Etsy Shop (actually, I bought three shades and Hilary sent me an extra one to review too, so I have another two Nelly Polish colours to share soon). My Barry M Gelly Nail Paint in Key Lime came from my local Boots.

Thursday 29 August 2013

Blue water marble with glitter (Pocket Money Polishes Keep The Faith)


Here's a manicure that evolved over a several days! I started out with plain, light blue nails - a sort of palate cleanser from all the glitter and nail art, lol! This is Zoya Blu - a really pretty light blue cream from Zoya's spring pastels collection earlier this year. I choose my colours by mood more than *season* as defined by the manufacturer!


Zoya Blu
Zoya Blu


Next day I added a water marble. I'm a relative beginner at water marbling, but I love the effect, so I've decided to try to a water marble every week to get more practice! In my last water marble I used just a single colour and clear polish to make a marbled pattern over a gradient, but this time I wanted to marble with several colours. I used Zoya Blu, Zoya Jacqueline, American Apparel Passport Blue and Rescue Beauty Lounge Cuprum.


It's not perfect of course, but I do like the way the patterns came out. RBL Cuprum worked in an interesting way, it spread really quickly and thinly over the water, and on the nail it looks a bit like a water colour wash.

My favourite nail was my middle finger on my left hand - here's a macro of that one. You can also see the coppery flecks in RBL Cuprum on the edge of my middle finger nail rather well in the macro. Although I like the fact that every nail turns out different in water marbling, I wish every nail came out as good as this. Obviously more practice is needed!


GLITTER, however, is great for covering imperfections! And because you can add it selectively, you can use it just to accent some areas of a nail art design:

Water marble with Pocket Money Polishes Keep The Faith


The glitter I used is Pocket Money Polishes Keep The Faith; this is a mix of slightly teal-ish blue glitters in hexes of various sizes, some tiny blue bar glitters and bigger pale gold holographic hexes. 


Pocket Money Polishes Keep The Faith
Pocket Money Polishes Keep The Faith 

I chose this glitter because the tone of blue matches up nicely with the blue shades in my water marble, and the pale gold hexes set off the warm cream of Zoya Jacqueline really well.

Water marble with Pocket Money Polishes Keep The Faith

Water marble with Pocket Money Polishes Keep The Faith
Water marble with Pocket Money Polishes Keep The Faith 

Zoya Blu and Jacqueline were part of a gift from a lovely polish friend, as was American Apparel Passport Blue. RBL Cuprum is a favourite from my stash - I got my bottle in a swap a while ago but the colour is still available to buy from the Rescue Beauty Lounge Website.

Charlie, the maker of Pocket Money Polishes, very kindly sent me Keep The Faith as a sample when I last ordered polish from her. Keep The Faith is one of the new Pocket Money Polishes colours for September, and goes on sale on 1st September at the Pockcet Money Polishes website, which includes a blog with information on new colours and release dates. You can also keep up with Charlie and her polishes on her facebook page


Wednesday 28 August 2013

Vampy matt gradient with Manglaze polishes - and *magic* dots!

Manglaze Fatty's Got More Blood, Santorum and Matte is Murder

I've been enjoying dots and gradients recently, and I've always had a soft spot for matt manicures, so I decided to combine all these things to try out something just a little bit different! This is a gradient with three Manglaze polishes (Fatty's Got More Blood (deep red), Santorum (brown) and Matte is Murder (black) and shiny topcoat dots.

Here is the gradient before I applied the dots. I painted my nails with Santorum, then added a gradient with a damp sponge in the normal way. Fatty's Got More Blood at the cuticle, Santorum in the middle and Matte is Murder at the tips. The colours are close; this was deliberate, I wanted this gradient to be subtle. The Manglaze polishes work really easily together to make the gradient - I was a little nervous that if the gradient wasn't smooth, then I wouldn't be able to rely on topcoat to make it smooth, but there was no problem at all. In fact I like the finish of the Manglaze polishes so much with the sponge application I might start sponging the last coat when I use a single Manglaze colour.

Manglaze Fatty's Got More Blood, Santorum and Matte is Murder

Then I added large dots with a clear topcoat. I used Sinful Colors Gel-Tech topcoat for this - this is a thick topcoat which dries fast to a high shine. I didn't want to use a thin topcoat or clear polish that would spread out over my nails before it dried, and I wasn't sure that SV would play nice. The Sinful topcoat worked perfectly! 

Manglaze Fatty's Got More Blood, Santorum and Matte is Murder


The topcoat really accentuates the differences between the Manglaze shades and the dots stand out very effectively from the base:

Manglaze Fatty's Got More Blood, Santorum and Matte is Murder


Manglaze Fatty's Got More Blood, Santorum and Matte is Murder

In this macro shot you can see how adding a shiny topcoat brings out all sorts of sparklies in the Manglaze polishes - I know there are many people who add a topcoat as a matter of routine but I like the matt finish far too much to ever do that. Not to whole nails anyway!

Manglaze Fatty's Got More Blood, Santorum and Matte is Murder

In different lights, the effect is more pronounced. The next couple of pictures are under my desk lamp:

Manglaze Fatty's Got More Blood, Santorum and Matte is Murder

Manglaze Fatty's Got More Blood, Santorum and Matte is MurderManglaze Fatty's Got More Blood, Santorum and Matte is MurderManglaze Fatty's Got More Blood, Santorum and Matte is Murder
Manglaze Fatty's Got More Blood, Santorum and Matte is Murder - artificial light

And finally, this shot under a daylight bulb shows the sparkle and the differences in the colours with the topcoat. The topcoat really does act like magic and brings something different out from each colour of the matt polish!

Manglaze Fatty's Got More Blood, Santorum and Matte is Murder
Manglaze Fatty's Got More Blood, Santorum and Matte is Murder - Daylight bulb

I got all of my Manglaze polishes in swaps at various times, but here is a link to the Manglaze website. My Sinful Colours Gel-Tech topcoat was a gift from a friend in the USA.


Tuesday 27 August 2013

Dalmations and Dominoes! Pocket Money Polishes Forever, Angels and Schools Out

Pocket Money Polishes Forever and Angels
Today I have two of Charlie's new Pocket Money Polishes September Sparkle Collection glitter toppers to show you - *Forever* and *Angels*. Charlie describes these as a pair of yin and yang polishes; I love black and white glitter in just about any format and I think it's a great idea to present the black glitter and white glitter separately - it allows for much more creativity!

Let's start with Forever. Forever is a mix of small black hexes, big black circles and iridescent bar glitters. In the bottle in reminds me of frogspawn - all black glitters do, lol!

Pocket Money Polishes Forever
Forever would look great over just about any colour, as long as the background wasn't so dark it blended in to the black. I was feeling in a bit of a monochrome mood, and the black circles put me in mind of dalmations - so here are my 'dalmation nails'!

Pocket Money Polishes Forever

I'm not very keen on pure white polish apart from for stamping and other nail art - I think it looks rather stark; I much prefer a cream shade. I've used American Apparel Cotton here - this is a super cream shade. The formula tends a little to streakiness, but two coats and SV is fine for under glitter. I'd probably use three coats of AA Cotton on its own.  I used two thin coats of Forever over the base, then a coat of Gelous and a coat of Seche Vite. The iridescent glitters are interesting - over a light base they are yellow-pink, but over dark they flash green and blue, as you can see in the bottle shot above.

If you get the angle just right though, you see an occasional subtle flash of green from these iridescent glitters, even over a pale base.

Pocket Money Polishes Forever

Pocket Money Polishes Forever

Much as I love the monochrome style, I'm always looking out for ways to change and extend the life of my mani! So I decided to a splash of bright colour with another awesome glitter topper from Charlie  ~ *School's Out*. This is a mix of primary red, yellow and blue matt hexagon glitter.  

Pocket Money Polishes School's Out

Given that School's Out combines all three primary colours, it probably works best over a neutral base - I'd been planning to create some black and white nail art to wear this over......... and then I realised that I had that black and white nail art!  So here is a single, light coat of School's Out over Forever and the off-white base. I love this effect - very Mondrian colour scheme!

Pocket Money Polishes Forever and School's Out

Pocket Money Polishes Forever and School's Out

The other half of the black and white glitter pair is Angels, which is small white hexes, white circles and the same iridescent bar glitter.  But see how different the iridescent glitter looks in the bottle with the white.

Pocket Money Polishes Angels
Reverse the effect above, and put the white glitter topper over a black nail and you have dominoes! I used American Apparel Hassid as my base here - this black is a one coater (certainly if you're putting something else on top).

Pocket Money Polishes Angels

How different the iridescent glitters look against the black base!

Pocket Money Polishes Angels

Pocket Money Polishes Angels
And then with a light coat of School's Out:

Pocket Money Polishes Angels and School's Out

I think the combination of Angels and School's out over black is less striking than Forever and School's Out over cream - I'm not sure if it's the iridescent glitters flashing green and blue that makes the whole mani look more *busy*, or if it's just that multi-coloured glitter over black is a combination that I've worn many times before. I still like the effect, nonetheless.

Pocket Money Polishes Angels and School's Out
And, finally - well of course you can combine the Forever and Angels! Obviously if you put on one coat of Forever and then a coat of Angels you'd get a black and white glitter mix that would look great over just about any colour. But I wanted to do something a bit different - that you couldn't get from a bottle of black and white glitter (of which I have many, in all shapes and sizes).

I've been working at improving my gradient technique for the last few weeks, and a challenge that I'd set myself was to do a black and white gradient........... so here it is; a perfect base for a black glitter and a white glitter!

Pocket Money Polishes Forever and Angels

Pocket Money Polishes Forever and Angels

This last picture shows a direct comparison of how the iridescent glitter in Forever and Angels looks on a dark and light background.
Pocket Money Polishes Forever and Angels

And finally, a macro of my gradient; I'm pleased with how that turned out! I painted my nails with American Apparel Cotton then applied a sponge gradient using American Apparel Cotton and Hassid. Although the black and white look scary together on the sponge, it actually worked quite easily. And for once I remembered to put tape around the edges of my nails, which made clean up a million times easier than it usually is when I do a gradient!

Pocket Money Polishes Forever and Angels

I purchased Pocket Money Polishes Forever, Angels and School's Out directly from Charlie at her website, which includes a blog with updates of restocks, launches and new colours. Forever and Angels go on sale on 1st September - I was lucky to be able to get a preview order :)  You can follow Charlie on facebook too. For anyone in the US who likes the look of Charlie's polishes, she is planning a US pop-up sale in September - details on this facebook page.

American Apparel Hassid and Cotton were part of a gift from a lovely US polish friend - American Apparel does have a UK website where you can buy the polishes but they seem rather pricey (£9) compared to the US rrp ($6). 


Saturday 24 August 2013

Gradient with Illamasqua Collide, Obsess and Stance and Nail Laquer UK Grape Juice


Nail Lacquer UK Grape Juice over gradient with Illamasqua bright pinks

A lot of polishes to get here, lol! Nail Lacquer UK's Grape Juice is mix of bright magenta and holographic glitters, all circular, in a jelly base that looks like red grape juice. There's been a few swatches of it already - Cazzy at Special Girl Nails wore it alone to show of its super-juicy beauty and Debbie at Knitty Nails chose a lovely rich dark plum to pair it with. I decided I wanted to try it over a bright pink but couldn't narrow my choice down beyond three Illamasquas - Collide, Obsess and Stance. So in the end I went for a gradient - when in doubt, use all the colours!

Collide is a true neon pink, Stance is an almost-neon magenta and Obsess is a bright pink somewhere between the two. All the colours are on the sheer side, so not the easiest to work with for a gradient, but I was so pleased with the end results I think it was well worth the effort. I painted my nails with Collide first, then applied the gradient with a damp makeup sponge. For this mani I painted the colours directly onto the sponge, overlapping each colour a bit and then use a 'smooshing' action with the sponge on my nail to get them to blend. Sometimes I put the colours on a bit of plastic sheet and press the sponge into the colour - I'm not sure it makes a much difference which method I use. Two things that I've found that do make a great deal of difference to whether a gradient works or not are making the sure the sponge is quite damp - if it gets dry the polish starts to somehow break down the structure of the sponge and then you get bits of sponge stuck all over your nails - and allowing the base colour to dry completely before starting the gradient.

Illamasqua Collide, Obsess and Stance

Illamasqua Collide, Obsess and Stance

Illamasqua Collide, Obsess and Stance


OK, lets just forget these are nails for a minute and enjoy the colour in an abstract shot - I love hot pink!

Illamasqua Collide, Obsess and Stance

Back to the polish I was meant to be reviewing, Nail Lacquer UK Grape Juice is a mix of magenta and holographic circular glitters in quite a dark pink jelly base:

Nail Lacquer UK Grape Juice

There's a lot of glitter in the polish, but the big glitters are quite hard to get out without a bit of fishing. This might be because the base is light and sheer - whatever, not a problem for me as I only wanted a few glitters and quite a bit of base. Yes, you can see printing over the bottle shot - this is because I did something stupid with my bottle of Grape Juice and had to transfer it into another bottle; the only empty bottle I had to hand was a Nubar one which has printing on!

I applied two thin coats of UK Nail Lacquer Grape Juice over my gradient, letting the base of Grape Juice act like a colour wash to darken and further blend the colours in the gradient. The gradient toned down a lot, but that was what I wanted, so that the glitters could take centre stage.

Nail Lacquer UK Grape Juice over gradient with Illamasqua bright pinks


NNail Lacquer UK Grape Juice over gradient with Illamasqua bright pinks
Nail Lacquer UK Grape Juice over gradient with Illamasqua bright pinks

I can just about handle circular glitters this big on my nails. I have a high c-curve so I do need to make sure that they are off to the sides of my nails, where they will lay flat, rather than right down the middle on the most curvy part. It must be so nice to have flat nail beds :(

Nail Lacquer UK very kindly sent me a mini bottle of Grape Juice as an extra with my last order from her Etsy Shop. I bought Illamasqua Collide and Stance from the Illamasqua website and Obsess was a gift from a friend.